In the previous article, I introduced weaving techniques for plain weaving and tapestry weaving.
This time let’s weave horizontal and vertical lines and polka dots. I will introduce the following items weaving through a sample.
See the following article for the preparation procedures:
前回の記事では、平織りおよびタペストリー織りの織り方を紹介しました。
今回は、横ライン、縦ラインおよびドット柄を織っていきましょう。サンプルを織りながら、以下の項目を説明していきます。
織る前の準備は、以下の記事を参考にしてください。
1. How to read the sample grid | サンプルグリッドの読み方
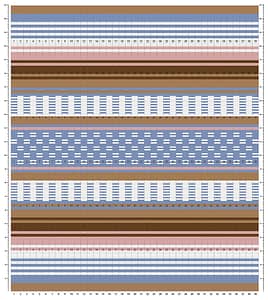
I will explain the basic reading of the sample grid used in this article.
この記事で使うサンプルグリッドの基本的な読み方を説明します。
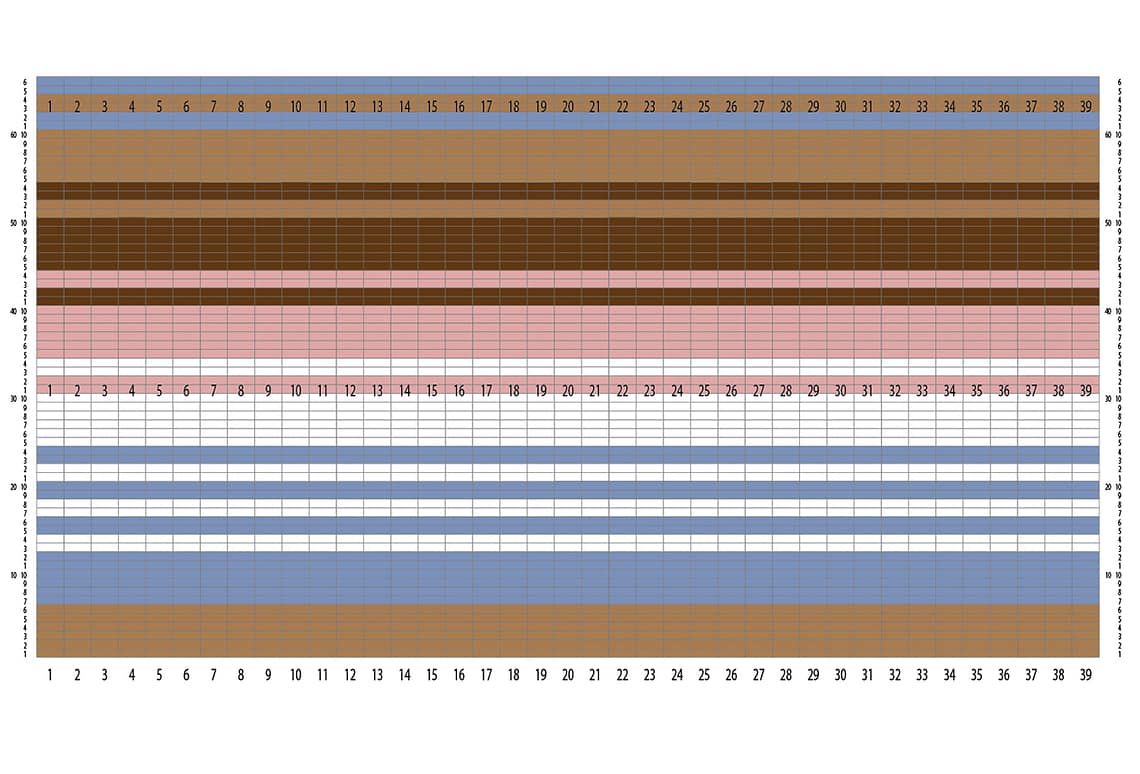

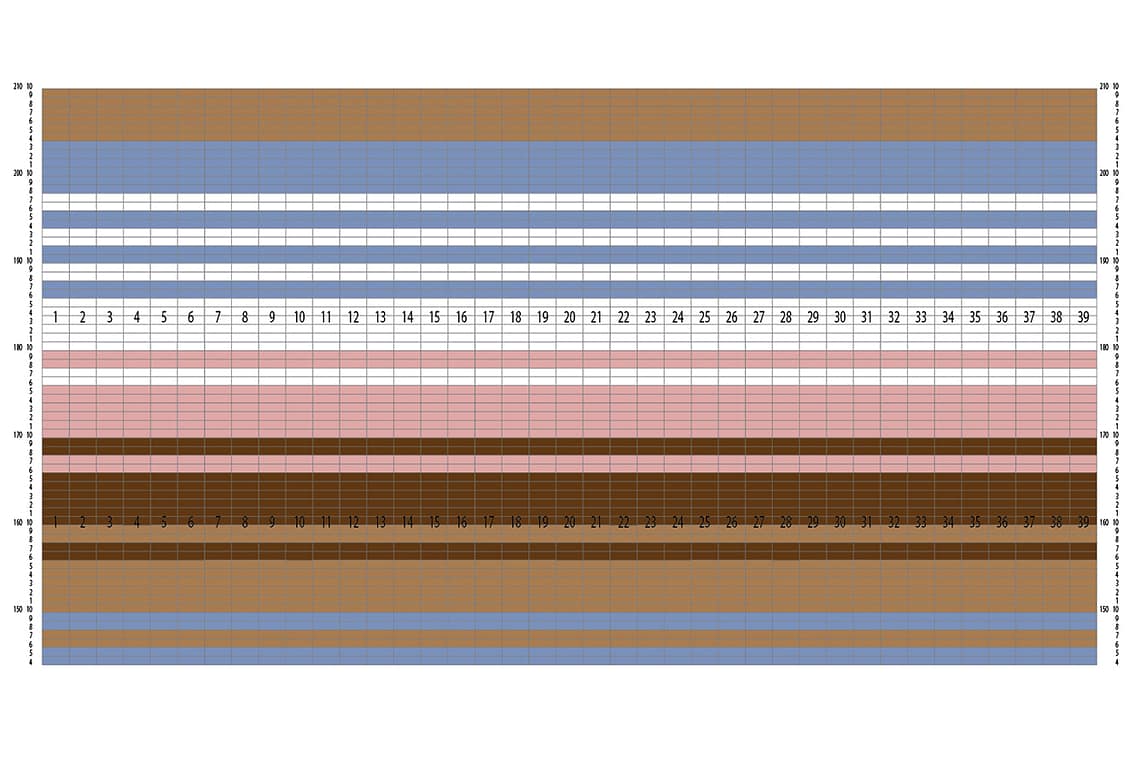
The illustrations 1-3 are enlarged from the overall grid to each part of the grid.
The horizontal numeral scales indicate the number of warps, and the vertical numeral scales indicate the number of weft picks.
Illustration 1 is the bottom part of the grid, from the first pick to the 66th pick.
For example, you can see that the first light brown and blue stripes consist of 6 picks each.
Illustration 2 is the middle part of the grid, from the 67th to the 143rd pick. It is woven using a technique called pick and pick. Details are explained in the vertical lines and polka dots sections.
Illustration 3 is the upper part of the grid, from the 144th to the 209th pick. The design is woven in the reverse order of the weaving in the bottom part.
全体的なグリッドから各パートに分けて拡大したのが、イラストの1~3になります。
横に並ぶ数字の目盛りが、ワープ(タテ糸)の数で、縦に並ぶ数字の目盛りが、ヨコ糸の段数を示します。
イラスト1は、下部のパートで、1段目から66段目までのグリッドです。
例えば、最初の薄茶とブルーのストライプは、各6段ずつで構成されているのがわかります。
イラスト2は、中間部のパートで、67段目から143段目までのグリッドです。ピック&ピックという技法で織っていきます。詳細は、縦ラインとドット柄のセクションで説明いたします。
イラスト3は、上部のパートで、144段目から209段目までのグリッドです。下部で織った順と逆に織っていくデザインになっています。
2. Weaving a stripe pattern as a sample | サンプルとしてストライプの模様を織ってみる
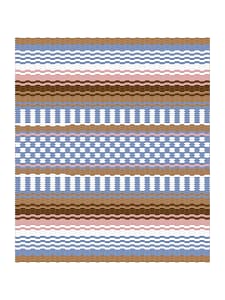
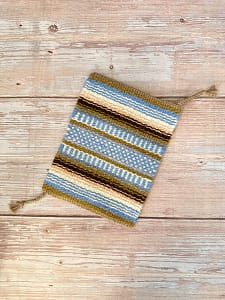
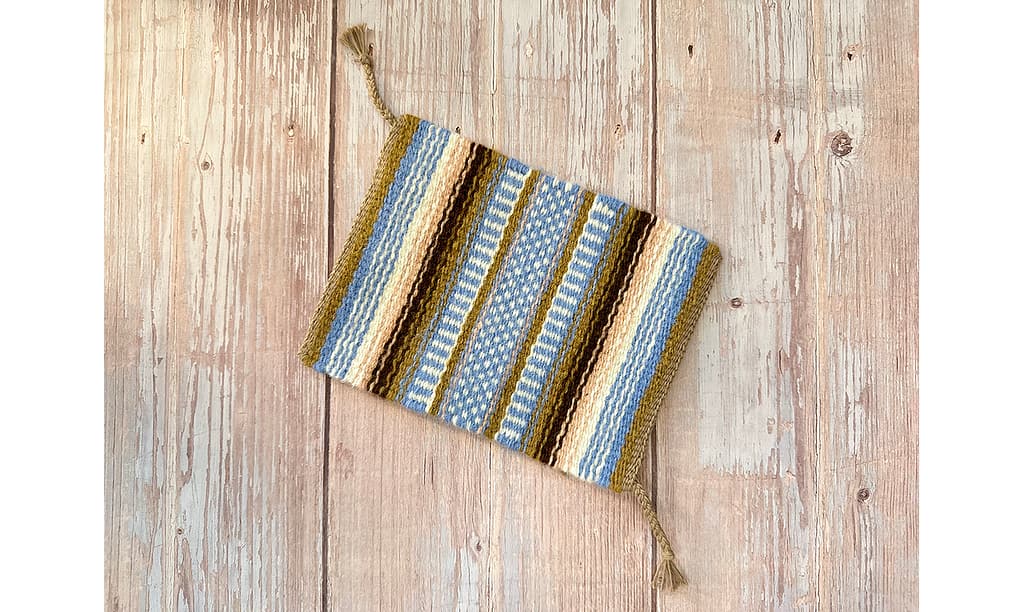
Let’s make a striped mini tapestry like the sample illustration.
See the grid illustrations explained in the section above as well. You can see how many picks the weft threads travel to make stripes.
The finished piece will look like photo 1.
I will introduce the basic techniques for weaving this sample in the following sections.
サンプルのイラストのようなストライプのミニタペストリーを作ってみましょう。
上のセクションで説明したグリッドのイラストも参考にしてください。何段のヨコ糸で各ストライプが作られているかが確認できます。
出来上がりは、写真1のようになります。
以下のセクションで、このサンプルを織るための基本的な技法を紹介します。
2-1. Horizontal lines with meet-and-separate weaving | ミート&セパレートによる横ライン
Horizontal lines from the first to the 12th picks are woven using the meet and separate technique.
1~12段目までの横のラインをミート&セパレートの技法で織っていきます。


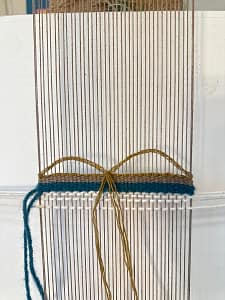
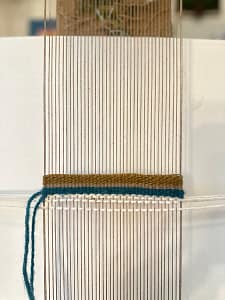
The weft for the first pick to make the first light brown stripe is placed in the middle to start, as shown in photos 1 and 2. In this method, no tailing is required.
The second pick is woven from both ends of the warp toward the center, as shown in photo 3.
最初の薄茶のストライプを織るためのヨコ糸は、写真1と2のように真ん中に置いてスタートします。この方法の場合、最初のテール処理が不要となります。
2段目は、写真3のように、ワープの両端から中心に向かって織ります。


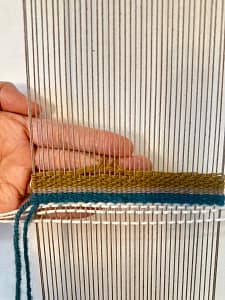
The third pick is woven from the center outward, as shown in photo 4.
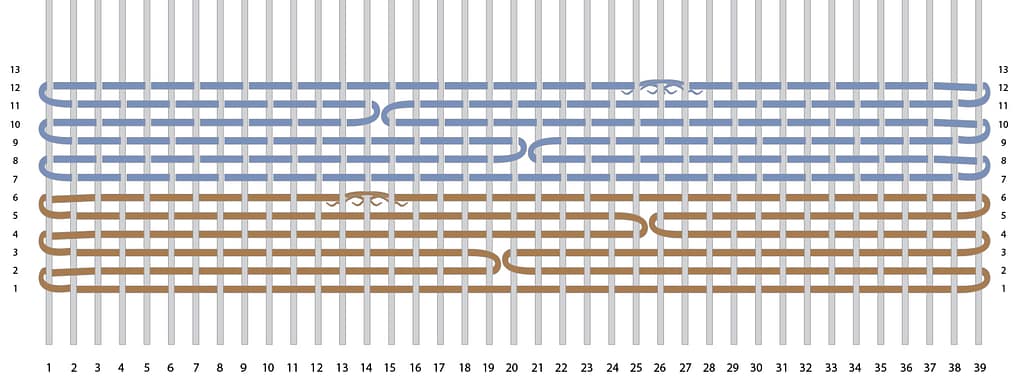
The point where each weft is turned is shifted slightly as shown in the illustration: from the 2nd to the 3rd pick, the weft threads are folded in the middle, from the 4th to the 5th pick, the weft threads are folded a little to the right.
6 picks are woven in this manner, and when each end of weft threads meet at the 6th pick, the tails are processed in the same manner as the splicing technique introduced in the previous article as shown in photos 5 and 6.
3段目は、写真4のように、中心から外側に向かって織ります。
ヨコ糸を折り返す地点は、イラストのように少しずつずらします。2段目から3段目に移るときは、真ん中あたりで折り返しましたが、4段目から5段目に移るときは、少し右側で折り返しました。
この方法で6段分を織っていき、最後に出会ったときに、前回の記事で紹介したヨコ糸をつなぎ合わせる技法と同様のやり方でテール処理を行います(写真5と6)。

This completes the first stripe (Photo 7).
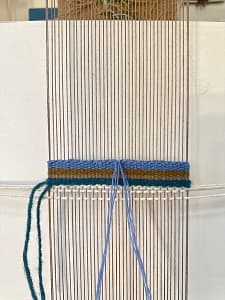
The next blue stripe is woven in the same way, with six picks (Photos 8 and 9).
FYI: See the following article for more information on tailing processes:
これで最初のストライプが完成です(写真7)。
次のブルーのストライプも同じ方法で6段織ります(写真8と9)。
ご参考:テール処理については、以下の記事で詳細に紹介しておりますので、参考にしてください。
2-2. Horizontal lines with plain weaving | 平織りによる横ライン
From the 13th pick, weave in the plain weaving technique.
13段目からは、平織りで進めます。


After tailing the white weft, weave the 13th and 14th picks (Photos 1-3). This creates a thin white stripe line. Leave the white weft uncut.
白のヨコ糸をテール処理した後、13段目と14段目を織ります。(写真1~3)。これで白の細い一本のストライプができました。白のヨコ糸は切らずに置いておきます。


Next, after tailing the blue weft, weave the 15th and 16th picks (Photos 4 and 5). This creates a thin blue stripe line as well. Leave the blue weft uncut, too.
Next, weave the white weft, which was left uncut earlier, into the 17th and 18th picks (Photos 6-8).
Likewise, weave the blue weft in the 19th and 20th picks (Photo 9).
続いて、ブルーのヨコ糸をテール処理した後、15段目と16段目を織ります(写真4と5)。これでブルーの細い一本のストライプができました。同様にブルーのヨコ糸も切らずに置いておきます。
次に、さきほど切らずに置いておいた白のヨコ糸を17段目と18段目に織ります(写真6~8)。
同じく、ブルーのヨコ糸を19段目と20段目に織ります(写真9)。


Proceeding in this manner, the blue weft is cut and tailed after weaving the 24th pick.
The pink stripe is woven in the same way (Photo 10), and the white weft is cut and tailed after weaving the 34th pick (Photo 11).
Continue weaving stripes in the same way until the 66th pick (Photo 12). At the 66th pick, leave the blue weft uncut.
このように進めていき、ブルーのヨコ糸は、24段目を織ったあとに、切ってテール処理をします。
ピンクのストライプも同様に織っていき(写真10)、白のヨコ糸は、34段目を織ったあとに、切ってテール処理をします(写真11)。
さらに、66段目まで同様の方法でストライプを織っていきます(写真12)。66段目では、ブルーのヨコ糸は切らずに置いておきます。

2-3. Vertical lines with pick and pick weaving | ピック&ピックによる縦ライン
In 67th to 79th picks, vertical stripes will be woven.
Here we use a technique called pick-and-pick.
67段目から79段目では、縦のストライプを織っていきます。
ここでは、ピック&ピックという技法を使います。

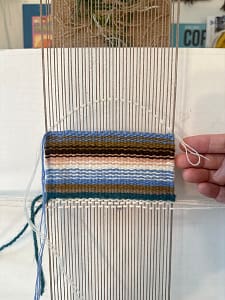
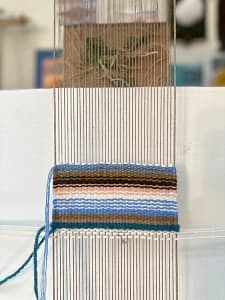
Continuing from the 66th pick, the same blue weft is woven for the 67th pick (Photo 1).
For the 68th pick, after tailing the white weft, only one pick is woven (Photos 2 and 3).
66段目からの続きで、67段目も同じブルーのヨコ糸を織ります(写真1)。
68段目は、白のヨコ糸をテール処理した後、この一段だけ織ります(写真2と3)。


In the 69th pick, the blue weft is wound once clockwise around the leftmost warp (Photo 4), and then once more clockwise around the first and second leftmost warps (Photo 5). After that, weave in plain weaving as shown in photo 6.
Note: The work of wrapping the weft around the warp threads occurs when this blue weft passes through the front side of the odd-numbered warp. If it passes through the back side of the odd-numbered warp, no wrapping will be done here. The next 70th white weft will travel through the front side of the odd-numbered warp, so the wrapping operation will be performed on the 70th white weft.
69段目は、ブルーのヨコ糸を一番左端のワープに時計回りで一回巻き付け(写真4)、さらにもう一回時計回りで、一番目と二番目の左端のワープに巻き付けます(写真5)。そのあと、写真6のように平織りします。
注意:ヨコ糸をワープに巻き付ける作業は、このブルーのヨコ糸が奇数番目のワープの表側を通るときに発生します。もし、裏側を通っている場合には、ここでは、巻き付ける作業は行われません。次の70段目の白のヨコ糸が奇数番目のワープの表側を通るので、巻き付ける作業は、70段目の白のヨコ糸で行います。

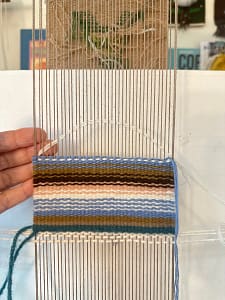

The 70th pick is woven with the white weft. See photos 7 and 8.
Note: If the white weft in the 70the pick runs along the front side of the warp of the odd-numbered warp, then the weft will be wrapped around the warp threads as described for the blue weft in the 69th pick above.
For the 71st pick, wrap the blue weft counterclockwise around the rightmost warp, then counterclockwise around the first and second rightmost warps (Photo 9).
70段目は、白のヨコ糸で織ります。写真7と8を参照してください。
注意:もし、70段目の白のヨコ糸が奇数番目のワープの表側を通っている場合には、上記の69段目のブルーのヨコ糸で説明したように、ワープに巻き付ける作業を行います。
71段目は、ブルーのヨコ糸を反時計回りで一番右のワープに巻き付け、さらに、反時計回りで、一番目と二番目の右端のワープに巻き付けます(写真9)。


After that, weave in plain weaving (Photo 10).
Note: Same as the note in the 69th pick above.
The 72nd pick is woven with the white weft. See photo 11.
Note: Same as the note in the 70th pick above.
Repeat the above steps until the 79th pick to create a vertical stripe pattern.
From the 80th to the 93rd picks, the stripe pattern is woven in plain weaving (Photo 12).
See also the sample grid.
そのあと、平織りします(写真10)。
注意:69段目の注意点と同様です。
72段目は、白のヨコ糸を織ります(写真11)。
注意:70段目の注意点と同様です。
以上のような手順を79段目まで繰り返すと、縦のストライプの柄が出来上がります。
80段目から93段目までは、サンプルにしたがって、ストライプ柄を平織りしていきます(写真12)。

2-4. Polka dots with pick and pick weaving | ピック&ピックによるドット柄
In the 94th through the 118th picks, a polka dot pattern will be woven.
In the previous section, I introduced how to create vertical lines using the pick-and-pick technique. In this section, I will show you how to create a polka dot pattern using the same pick-and-pick technique.
94段目から118段目では、ドット柄を織っていきます。
前のセクションでは、ピック&ピックの手法で縦ストライプを作る方法を紹介しました。このセクションでは、同じピック&ピックの手法でドット柄を作る方法を紹介します。


The 94th pick is woven with the white weft (Photo 1).
The 95th pick is woven with the blue weft (Photo 2).
The 96th pick is woven with the white weft (Photo 3).
Note: If the white weft in the 96th pick runs through the front side of the odd-numbered warp, the wrapping operation described in the 101st pick below will be performed here.
94段目は、白のヨコ糸で織ります(写真1)。
95段目は、ブルーのヨコ糸で織ります(写真2)。
96段目は、白のヨコ糸で織ります(写真3)。
注意:もし、96段目の白のヨコ糸が奇数番目のワープの表側を通っている場合には、下記の101段目の作業をここで行います。


For the 97th pick, wrap the blue weft counterclockwise around the rightmost warp, then counterclockwise around the first and second rightmost warps (Photo 4).
After that, weave in plain weaving (Photo 5).
Note: If the blue weft in the 97th pick travels through the back side of the odd-numbered warp, no wrapping operation will be required here.
Continue weaving the 98th pick with the blue weft (Photo 6).
97段目では、ブルーのヨコ糸を反時計回りで一番右のワープに巻き付け、さらに、反時計回りで、一番目と二番目の右端のワープに巻き付けます(写真4)。
そのあと、平織りします(写真5)。
注意:もし、97段目のブルーのヨコ糸が奇数番目のワープの裏側を通っている場合には、ワープに巻き付ける作業はここでは行いません。
続けて、98段目もブルーのヨコ糸で織ります(写真6)。


The 99th pick is woven with the white weft (Photo 7).
The 100th pick is woven with the blue weft (Photo 8).
Note: If the blue weft in the 100th pick travels through the front side of the odd-numbered warp, the wrapping operation described in the 97th pick above will be performed here.
For the 101st pick, wrap the white weft clockwise around the leftmost warp, then clockwise around the first and second leftmost warps (Photo 9). After that, weave in plain weaving.
Note: If the white weft in the 101st pick travels through the back side of the odd-numbered warp, no wrapping operation will be required here.
99段目は、白のヨコ糸で織ります(写真7)。
100段目は、ブルーのヨコ糸で織ります(写真8)。
注意:もし、100段目のブルーのヨコ糸が奇数番目のワープの表側を通っている場合には、上記の97段目の作業をここで行います。
101段目では、白のヨコ糸を時計回りで一番左のワープに巻き付け、さらに、時計回りで、一番目と二番目の左端のワープに巻き付けます(写真9)。そのあと、平織りします。
注意:もし、101段目の白のヨコ糸が奇数番目のワープの裏側を通っている場合には、ワープに巻き付ける作業はここでは行いません。


The 102nd and 103rd picks are woven in plain weaving with the blue weft (Photo 10).
Repeat the above steps until the 118th pick, and the polka dot pattern is completed as shown in photo 11.
After this, as shown in photo 12, weave in the reverse order of what we have done so far.
See also the sample grid.
102段目と103段目は、ブルーのヨコ糸で平織りします(写真10)。
以上の手順を118段目まで繰り返すと、写真11のようにドット柄が出来上がります。
この後は、写真12のように、いままでと逆の順番で織っていきます。
サンプルグリッドも参考にしてください。


The body is now completed! | これで本体が完成しました!


When all the stripes at the top part have also been woven, the weaving is now complete.
As a next step, let’s move on to the finishing process.
See the following article for more details on the finishing.
Thank you for reading to the end!
Sample grid PDFs are attached so that you can enlarge it. Please feel free to download and view it.
最後まで読んでいただき、ありがとうございます。
拡大して見ていただけるように、サンプルグリッドのPDFを添付します。ご自由にダウンロードしてご覧ください。
 Stripes weaving sample (grid)