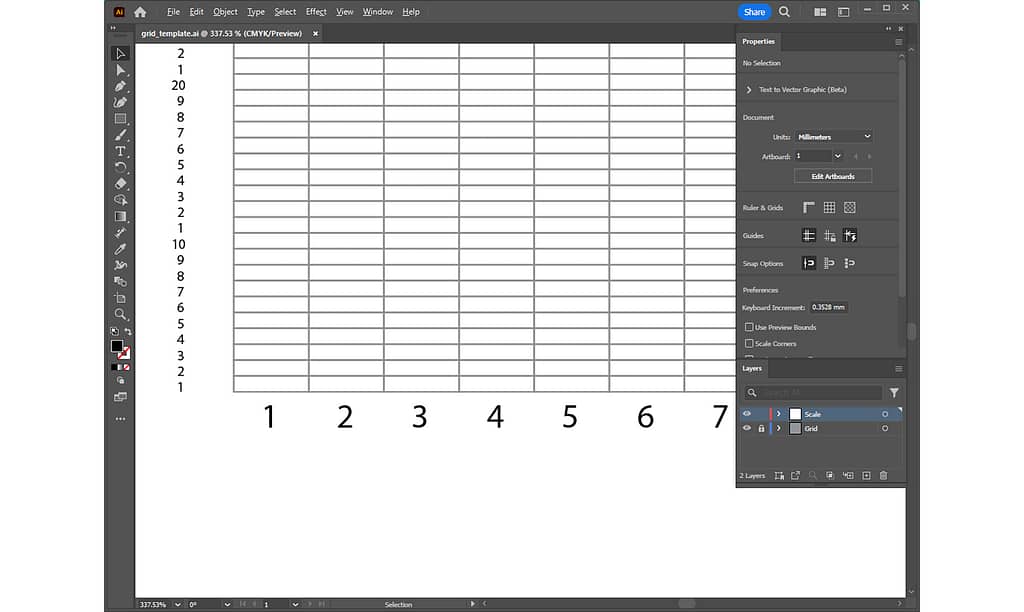
In creating a weaving design in Adobe Illustrator from now on, the first thing to do is to create a template with just a grid.
This may take some time at first, but as you become more familiar with Illustrator, you will be able to create it quickly.
The general procedure is as follows:
- Collect several past works and measure their sizes
- Calculate the aspect ratio of a rectangle that makes up the grid
- Create a rectangle in Illustrator
- Duplicate the rectangle horizontally to create the first grid row
- Fine-tune the first grid row
- Duplicate the first row of the grid upwards
- Set grid fill and line for ease of work
- Lock the grid layer
- Add scale to the grid
- Save the file
I would also like to introduce shortcut keys for working quickly.
Adobe Illustrator でウィービングのデザインを作成する前に、まずは、グリッドだけのテンプレートを作っていきます。
最初は時間がかかるかもしれませんが、Illustrator の操作に慣れていくと、すばやく作ることができると思います。
大まかな手順としては、以下になります。
- 過去の作品をいくつか集めサイズを測る
- グリッドを構成する長方形の縦横比を計算する
- Illustrator で長方形を作成する
- 長方形を横に複製し、一段目のグリッドを作成する
- 一段目のグリッドを微調整する
- 一段目のグリッドを上に複製していく
- 作業しやすいように、グリッドの塗りと線を設定する
- グリッドレイヤーをロックする
- グリッドに目盛を付ける
- ファイルを保存する
すばやく作業するためのショートカットキーも紹介していきたいと思います。
1. Collect several past works and measure their sizes | 過去の作品をいくつか集めサイズを測る
To make the grid as accurately sized as possible, collect some of your previous work.
Note that you need to collect pieces woven with the same warp SETT. For an explanation of warp SETT, see the following article:
グリッドをできるだけ正確なサイズで作成するために、過去に作った作品をいくつか集めます。
このとき、同じワープ SETT で織ったものを集めてください。ワープ SETT についての説明は、以下の記事を参考にしてください。
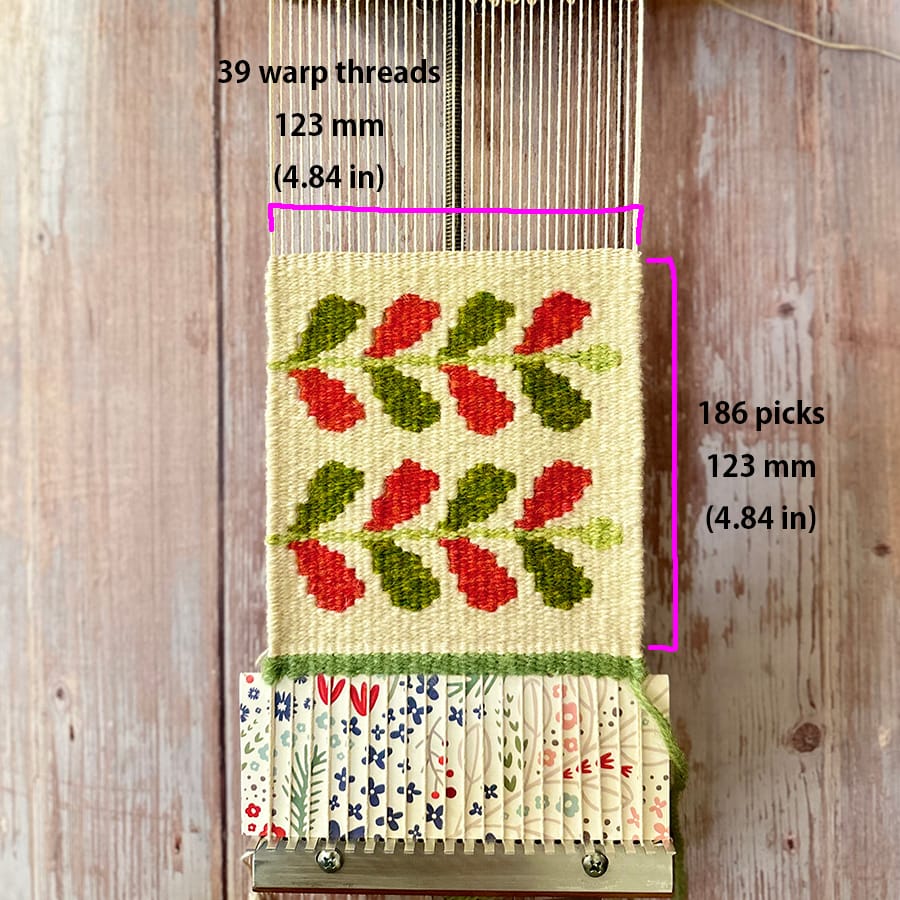
The photo shows a sample woven on 8 EPI warp SETT, consisting of 39 warp threads, woven on 186 weft picks. The length and width of the body alone, not including the top and bottom headers, were measured to be approximately 123 mm (4.84 inches) square.
If you are not sure how many weft picks the entire piece was woven with, visually count about 20 weft picks and measure the length of them.
写真は、 8 EPI のワープ SETT で織ったサンプルです。39本のワープで構成されていて、186段のヨコ糸で織りました。上下のヘッダーを含まずに、本体だけの縦と横の長さを測ったところ、ほぼ正方形で、123 mm(4.84 インチ)四方となっています。
もし、全体が何段のヨコ糸で織ったか不明な場合には、20段分くらいを目視で数えて、その長さを測ってください。
2. Calculate the aspect ratio of a rectangle that makes up the grid | グリッドを構成する長方形の縦横比を計算する
Formulas | 計算式:
| Horizontal length of the rectangle: Horizontal length of the body of the work ÷ Number of warp threads 長方形の横の長さ: 作品の本体の横の長さ ÷ ワープの本数 |
| Vertical length of the rectangle: Vertical length of the body of the work ÷ Number of picks of weft 長方形の縦の長さ: 作品の本体の縦の長さ ÷ ヨコ糸の段数 |
Using the numbers identified in procedure 1 above, find the aspect ratio of a single rectangular cell that makes up the grid.
For convenience, millimeters will be used as the unit of measurement in this article.
Let’s apply the sample numbers to the formulas.
| Horizontal length of the rectangle = 123 mm ÷ 39 = approx. 3.15 mm Vertical length of the rectangle = 123 mm ÷ 186 = approx. 0.66 mm |
If you do not know the overall number of weft picks, visually count 20 picks, for example, if the length of 20 picks of weft is 14 mm, then calculate as follows:
| Vertical length of the rectangle = 14 mm ÷ 20 = approx. 0.7 mm |
In this way, the aspect ratio of the rectangular cells that make up the grid can be confirmed.
上記の手順1で確認した数字を使って、グリッドを構成するひとつの長方形セルの縦横比を求めます。
便宜上、この記事ではミリメートルを単位として説明を進めます。
計算式にサンプルの数字を当てはめてみましょう。
| 長方形の横の長さ = 123 mm ÷ 39 = 約 3.15 mm 長方形の縦の長さ = 123 mm ÷ 186 = 約 0.66 mm |
もし、ヨコ糸の全体的な段数がわからない場合は、目視で20段分を数えて、たとえば、その長さが 14 mmだとしたら、以下のように計算します。
| 長方形の縦の長さ = 14 mm ÷ 20 = 約 0.7 mm |
このようにして、グリッドを構成する長方形セルの縦横比を確認することができます。
3. Create a rectangle in Illustrator | Illustrator で長方形を作成する
From this point on, let’s work in Illustrator to create a single rectangular cell using the numbers obtained in procedure 2 above.
Follow the steps below:
- See the previous article to create a blank document in Illustrator.
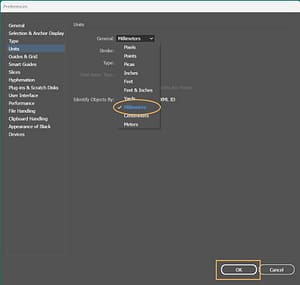
Adobe Illustrator for Weaving Grid Design - Go to Edit menu – Preferences – Units to set the General unit to Millimeters.
ここからは、Illustrator での作業となります。上の手順の2で求めた数字を使って、ひとつの長方形セルを作成します。
以下のステップで進めます。
- 前回の記事を参考にして、Illustrator で白紙のドキュメントを作成します。
手織りグリッドデザインのためのアドビ イラストレーター - 編集メニュー/環境設定/単位 を選択し、一般の単位をミリメートルに設定をしておきましょう。
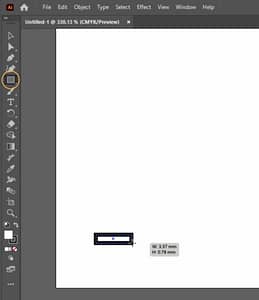
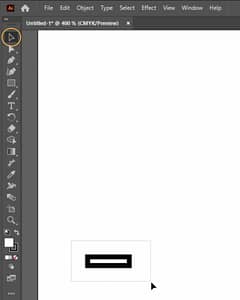
- The first rectangular cell will be created in the lower left corner of the artboard, so enlarge the screen to make it easier to work with.
- Select the Rectangle tool from the vertical toolbar on the left.
- With the Rectangle tool, drag on the artboard to create a small rectangle.
- アートボードの左下に一つ目の長方形セルを作っていきますので、作業しやすいように、画面を拡大します。
- 左に縦に並ぶツールバーで、長方形ツールを選択します。
- 長方形ツールで、アートボード上をドラッグして、小さい長方形を作成します。
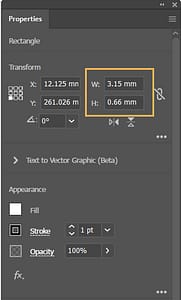
- With the rectangle selected, enter “3.15” in the “W” field and “0.66” in the “H” field in the Properties panel.
If the rectangle is deselected, select the Selection tool on the toolbar, select the rectangle to enclose it, and then enter the numerical values in the Properties.
- 長方形が選択されている状態で、プロパティパネルの「W」のフィールドに「3.15」、「H」のフィールドには「0.66」と入力します。
もし、長方形の選択が解除されている場合には、ツールバーの選択ツールを選び、長方形を囲うように選択してから、プロパティに数値を入力します。
4. Duplicate the rectangle horizontally to create the first grid row | 長方形を横に複製し、一段目のグリッドを作成する
Next, duplicate the first rectangular cell created in procedure 3 horizontally by the number of warp threads.
Follow the steps below:
次は、手順の3で作った一つ目の長方形セルを、ワープの本数分、横に複製していきます。
以下のステップで進めます。
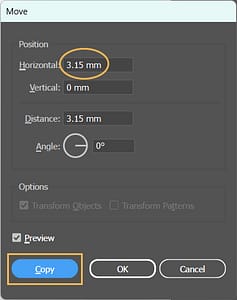
- With the rectangle still selected, Go to Object menu and select Transform – Move in that order.
If the rectangle is deselected, select the Selection tool on the toolbar, select the rectangle to enclose it, and then select Object menu – Transform – Move. - In the Horizontal field of the Move dialog, enter 3.15 mm and click the Copy button. The rectangle is now duplicated to its right neighbor.
- 長方形がまだ選択されている状態で、オブジェクトメニュー/変形/移動 の順番に選択します。
もし、長方形の選択が解除されている場合には、ツールバーの選択ツールを選び、長方形を囲うように選択してから、オブジェクトメニュー/変形/移動 を選択します。 - 移動ダイアログの「水平方向」のフィールドで、「3.15 mm」と入力し、コピーボタンをクリックします。これで、右隣りに長方形が複製されました。
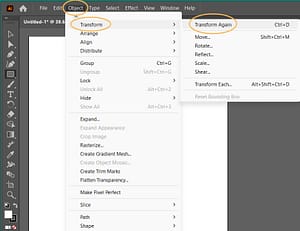
- You can repeat the same process for the remaining number of warp threads, but a faster way is to use Transform Again command.
Click on Object menu – Transform and select Transform Again at the top.
There is also a shortcut key for the command. On Mac computers, press the Command key on the keyboard first, followed by the “D” key; on Windows, press the Ctrl key first, followed by the “D” key, to execute the Transform Again command.
- 同じ作業を、残りのワープの本数分繰り返してもいいですが、もっと早く行う方法として、変形の繰り返しコマンドを使います。
オブジェクトメニュー/変形 をクリックし、一番上にある変形の繰り返しを選択します。
または、ショートカットキーを使います。マックの場合は、キーボードのコマンドキーを先に押しながら、続いて「D」のキーを押す、Windows の場合は、Ctrlキーを先に押しながら、続いて「D」のキーを押す、という動作を行うと、変形の繰り返しコマンドが実行されます。
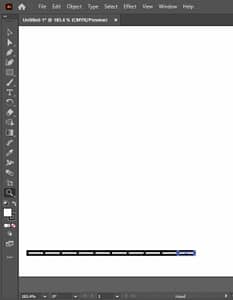
- In the sample, there are 39 warp threads, so I will duplicate them so that 39 rectangular cells line up horizontally.
- サンプルでは、39本のワープとなっているので、長方形セルが横方向に39個並ぶよう、複製していきます。
5. Fine-tune the first grid row | 一段目のグリッドを微調整する
The next task will vary depending on the size of the piece you design, but here is an explanation based on the settings used in the sample “8 EPI in SETT with 39 warp threads“.
There is a blank space on the right side of the first grid just created, so I want to expand it to use as much artboard space as possible.
The steps are as follows:
- Select the first grid row. If it is deselected, select the Selection tool on the toolbar and choose 39 rectangles to enclose.
Alternatively, there is a shortcut key. On Mac computers, press the Command key on the keyboard first, followed by the “A” key; on Windows, press the Ctrl key first, followed by the “A” key, to execute the Select All command.
- Then click on Object menu – Transform again, this time selecting Scale.
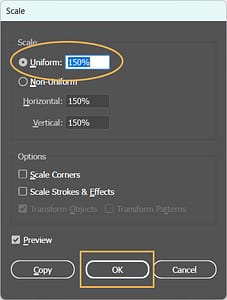
- Enter “150%” in the “Uniform” field and click OK.
次に行う作業は、デザインする作品の大きさによっては、まちまちになると思いますが、ここでは、「ワープ SETT が 8 EPI で39本のワープ」というサンプルで使っている設定をもとに説明します。
いま作った一段目のグリッドの右側に余白が余っていますので、アートボードのスペースをできるだけ使うように拡大したいと思います。
ステップは、以下になります。
- 一段目のグリッドを選択します。選択が解除されている場合には、ツールバーの選択ツールを選び、39個の長方形を囲うように選択します。
または、ショートカットキーを使います。マックの場合は、キーボードのコマンドキーを先に押しながら、続いて「A」のキーを押す、Windows の場合は、Ctrlキーを先に押しながら、続いて「A」のキーを押す、という動作を行うと、すべてを選択コマンドが実行されます。
- そのあと、再度、オブジェクトメニュー/変形 をクリックし、今度は、拡大・縮小 を選択します。
- 「縦横比を固定」のフィールドに「150%」と入力し OK をクリックします。
- If the grid extends outside of the artboard, drag it with the Selection tool and move it to fit inside the artboard.
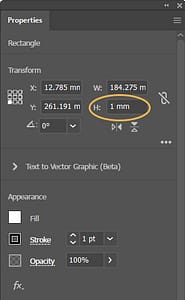
- You will see that after 150% enlargement, the vertical length of the rectangle is now 0.99 mm in the Properties panel. Since the difference is very small, I would like to add 0.01 mm to make it “1 mm“.
With the entire area still selected, enter “1 mm” in the H field in the Properties panel.
- グリッドがアートボードの外側にはみ出てしまった場合には、選択ツールでドラッグし、アートボードの内側に収まるように移動します。
- プロパティパネルで数値を見ると、150%拡大後、長方形の縦の長さが 0.99 mm となりました。誤差程度の違いなので、0.01mm加えて、「1 mm」としたいと思います。
まだ全体を選択している状態で、プロパティパネルの H フィールドで「1 mm」と入力してください。
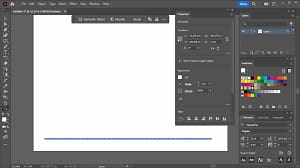
This completes the first row of the grid.
これで、一段目のグリッドが完成しました。
6. Duplicate the first row of the grid upwards | 一段目のグリッドを上に複製していく
The next task is to duplicate the first grid row to upper side by the number of picks of the weft.
The steps are as follows:
- With the entire first grid selected, select Object menu – Transform – Move in this order.
- Enter “0 mm” for the Horizontal direction and “-1 mm” for the Vertical direction, then click the Copy button. A negative value will duplicate the object upwards.
次は、一段目のグリッドをヨコ糸の段数分、上側に複製していきます。
ステップは、以下になります。
- 一段目のグリッドが全部選択されている状態で、オブジェクトメニュー/変形/移動 の順番に選択します。
- 水平方向は、「0 mm」、垂直方向は「-1 mm」と入力し、コピーボタンをクリックしてください。マイナスの数値にすると、上に複製されます。
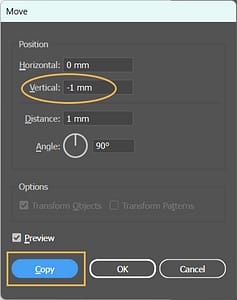
- Repeat the Transform Again command described in procedure 4 to duplicate for 10 rows.
- Once 10 rows have been duplicated, select the entire objects again and choose Object menu – Transform – Move in the order.
- Enter “0 mm” for the Horizontal direction and “-10 mm” for the Vertical direction, then click the Copy button.
20 rows are now duplicated.
- 手順の4で説明した変形の繰り返しを行って、10段分複製していきましょう。
- 10段分が複製できたら、再度全体を選択し、オブジェクトメニュー/変形/移動 の順番に選択します。
- 水平方向は、「0 mm」、垂直方向は「-10 mm」と入力し、コピーボタンをクリックしてください。
これで、20段目まで複製されました。

- Repeat the Transform Again command to duplicate for 100 rows.
- When 100 rows have been duplicated, select the entire objects again and go to Object menu – Transform – Move in the order.
- Enter “0 mm” for the Horizontal direction and “-100 mm” for the Vertical direction, then click the Copy button.
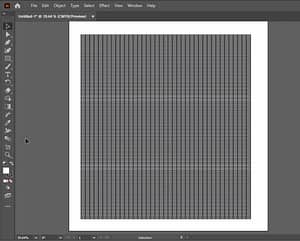
Now, 200 rows have been duplicated.
In this way, duplicate the required number of rows.
- 変形の繰り返しを行って、100段目まで複製していきましょう。
- 100段分が複製できたら、再度全体を選択し、オブジェクトメニュー/変形/移動 の順番に選択します。
- 水平方向は、「0 mm」、垂直方向は「-100 mm」と入力し、コピーボタンをクリックしてください。
これで、200段目まで複製されました。
このように、必要な段数分を複製していきます。

7. Set grid fill and line for ease of work | 作業しやすいように、グリッドの塗りと線を設定する
Let’s do a few more tasks to get the template ready. Here, let’s set up grid fill and line.
Follow the steps below:
- Select the whole rectangles, click on the color box next to “Fill” in the Properties panel, and select None. The color inside the rectangles will become transparent.
あといくつかの作業を行って、テンプレートを整えていきましょう。ここでは、グリッドの塗りと線を設定していきます。
以下のステップで進めます。
- 全体を選択し、プロパティパネルの「塗り」の横にある色のボックスをクリックして、「なし」を選択します。長方形の内側の色が透明になります。
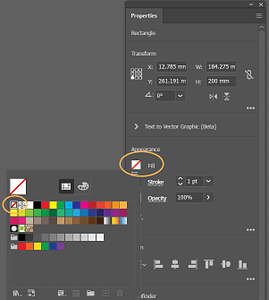
- Select the color box next to “Stroke” and choose the middle gray color. Further, set the line thickness to “0.25 pt“.
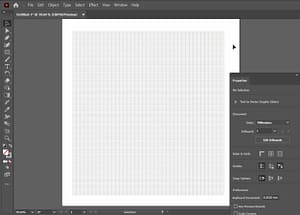
Clicking on an empty area of the artboard will deselect all rectangles and you can see the entire image.
- 次に、「線」の横にある色のボックスを選択し、真ん中くらいのグレーを選択します。さらに太さを「0.25 pt」にします。
アートボードの何もない部分をクリックすると、すべての長方形の選択が解除され、全体を確認することができます。


In this way, the grid lines will be thin and light in color, so they will not interfere with the work you are designing.
このように、グリッドのラインを細く薄い色にすることで、デザインする作業を邪魔しなくなります。
8. Lock the grid layer | グリッドレイヤーをロックする
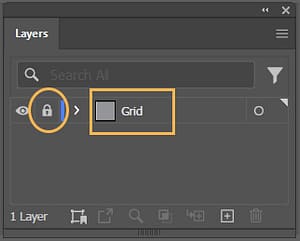
I would like to lock the grid just created so that it will not move due to wrong operation. Here is how to lock it:
- Display the Layers panel. If it is not displayed, select Layers from the Window menu to display it.
- Double-click “Layer 1” to make the text editable. I would like to rename it “Grid” to make it easier to work with in the future.
- Next, click on the space between this layer and the eye icon to the left to reveal the lock icon. This will lock the layer.
今作ったグリッドが誤操作によって動いてしまうことがないように、ロックしておきたいと思います。ここでは、以下のステップで、レイヤーを使ってロックします。
- レイヤーパネルを表示します。表示していない場合は、ウィンドウメニューからレイヤーを選択して表示します。
- 「レイヤー1」をダブルクリックしてテキストが編集できる状態にします。今後作業しやすいように名前を「グリッド」に変更したいと思います。
- 次に、このレイヤーの左にある目のアイコンとの間のスペースをクリックし、錠アイコンを表示させます。これでこのレイヤーがロックされます。
9. Add scale to the grid | グリッドに目盛を付ける
Let’s do one last task. I would like to add scales to the grid as follows:
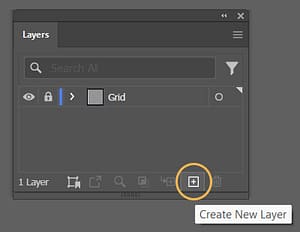
- To create scales on a new layer, click “Create New Layer” in the Layers panel to create a layer called “Layer 2“.
最後にもうひとつ作業をしましょう。以下のステップで、グリッドに目盛を付けていきます。
- 新しいレイヤーに目盛を作成してしていくために、
レイヤーパネルの「新規レイヤーを作成」をクリックし、「レイヤー2」という新規レイヤーを作成します。
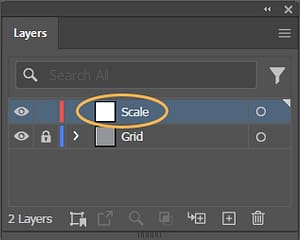
- Here, I would like to rename it to something easy to understand, such as “Scale“.
- ここでは、レイヤーの名前を「目盛」「めもり」「スケール」などわかりやすい名前に変更しておきたいと思います。
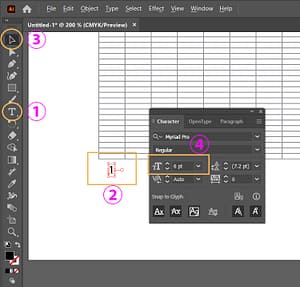
- Now, to make it easier to work with, zoom in on the screen to enlarge the bottom left-most rectangle of the grid.
- Select the Type tool.
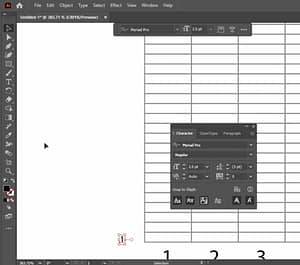
- Click under the bottom left-most rectangle of the grid. Enter the number “1“. Select back to the Selection tool and set the font size in the Character panel. In this case, I will set it to “6 pt“.
- 次に、作業しやすいように、画面を拡大して、グリッドの一番左下の長方形を大きく表示してください。
- 続いて、文字ツールを選択します。
- グリッドの一番左下の長方形の下でクリックします。数字の「1」を入力します。選択ツールに一旦持ちかえてから、文字パネルで文字の大きさを設定します。ここでは、「6 pt」とします。
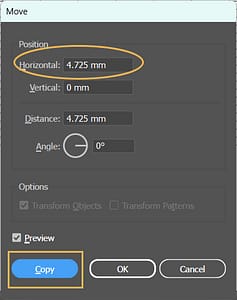
- Select Object menu – Transform – Move in this order.
- Enter “4.725 mm” for the Horizontal direction and “0 mm” for the Vertical direction, then click the Copy button. The number “1” is now copied under the adjacent rectangle as well.
- 続けて、オブジェクトメニュー/変形/移動 の順番に選択します。
- 水平方向は、「4.725 mm」、垂直方向は「0 mm」と入力し、コピーボタンをクリックしてください。隣の長方形の下にも数字の「1」がコピーされました。
- Execute the Transform Again command to duplicate for 10 pieces.
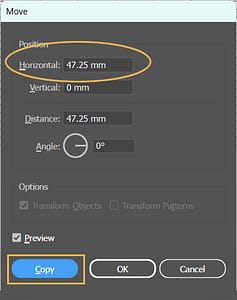
- Once 10 numbers are made, the number “1” is in a line of 10, so retype the letters 2, 3, 4, …. After entering up to 10, select 1 through 10 and duplicate them horizontally to 47.25 mm.
- 変形の繰り返しを行って、10 個分複製していきましょう。
- 10個複製されたら、1が10個並んでいる状態ですので、2、3、4、…と文字を入力しなおします。10まで入力したら、今度は、1 から 10 を選択し、水平方向「47.25 mm」に複製します。
- Repeat the Transform Again command two more times, retype the numbers, and the horizontal scale is complete.
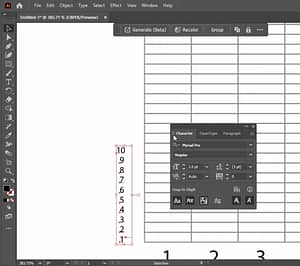
- Repeat the process for the vertical scale in the same way, using “-1 mm” for the vertical direction.
- The font size of the vertical scale is set to 2.5 pt here by entering “2.5” in the font size text field.
- 変形の繰り返しをあと二回繰り返し、数字を入力しなおしたら、横の目盛が完成です。
- 縦の目盛も同様で、垂直方向は「-1 mm」で複製を繰り返して目盛を付けていきましょう。
- 縦の目盛の文字の大きさは、ここでは、文字サイズのテキストフィールドに「2.5」と入力して、2.5 pt に設定しました。


10. Save the file | ファイルを保存する
Now that the grid template is complete. Thanks for your hard work!
Let’s save the file.
- Go to File menu and select Save.
- The file format should be saved as “.AI” in Adobe Illustrator format.
これでグリッドテンプレートが完成しました。大変お疲れさまでした!
最後にファイルを保存しましょう。
- ファイルメニューから保存を選択します。
- ファイル形式は、Adobe Illustrator 形式の「.AI」で保存してください。

The series of steps in the above procedure #3 to #10 can be viewed in the YouTube video. Although some detailed work is involved, I hope it will be helpful.
Note that different warp SETT (EPI) and weft thicknesses will result in different aspect ratios of the rectangular cells that make up the grid.
I recommend you measure and create a template based on the tapestry pieces you usually create frequently.
Thank you for reading to the end!
以上の手順3~10のステップを YouTube 動画で見ていただくことができます。細かい作業も含まれますが、参考になれば幸いです。
注意点としては、ワープSETT(EPI)やヨコ糸の太さが異なると、グリッドを構成する長方形セルの縦横比も異なります。
まずは、普段よく作る作品をもとに測って、テンプレートを作ってみてください。
最後まで読んでいただき、ありがとうございます。