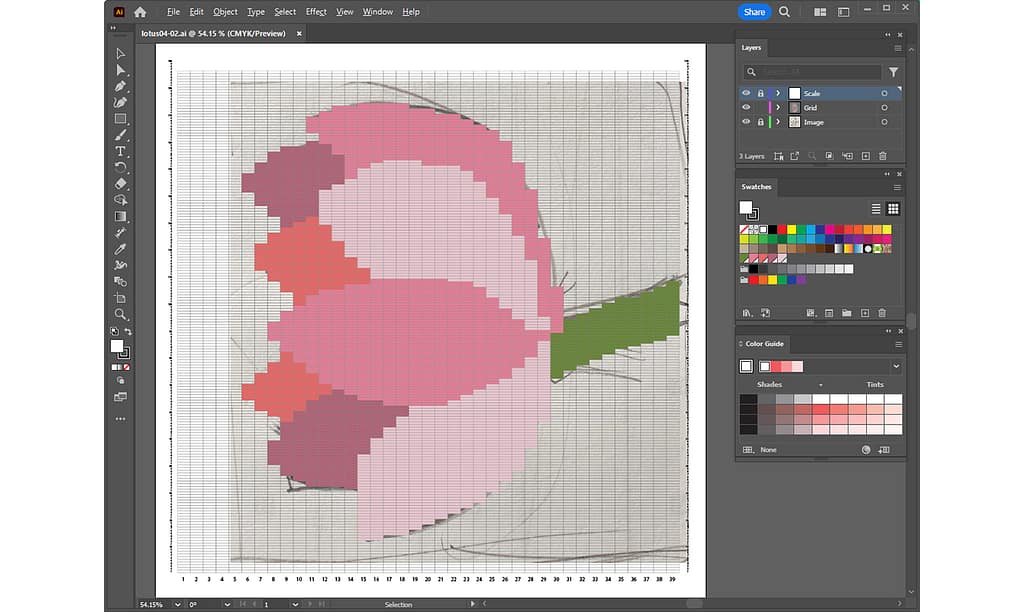
Have you ever heard of pixel art? It is a picture composed of small squares, an art form reminiscent of early computer and video game screens.
The process from here is similar to the process of creating pixel art. Pixel art is created in square, whereas a weaving grid consists of long horizontal rectangles. These rectangles will be used to create pixel art.
In this article, I will show you how to use a rough sketch imported into Adobe Illustrator to apply color to the grid.
First of all, let me say that this work will require a little patience, but I would be happy if you could stay with me until the end.
For previous articles, please refer to the following links:
- [1] For basic information and basic operations of Illustrator, Adobe Illustrator for Weaving Grid Design
- [2] For information on how to create a grid template, Creating a Grid Template in Adobe Illustrator
- [3] For information on how to import a rough sketch, Placing a Rough Sketch in Adobe Illustrator
The general procedure for this work is as follows:
ピクセルアートをご存じでしょうか?小さな四角で構成されている絵のことで、初期のコンピュータやビデオゲームの画面を思い起こさせるアートです。
ここからの作業は、ピクセルアートを作る作業に似ています。ピクセルアートは正方形で作りますが、手織りのグリッドは、横に長い長方形で構成されます。この長方形でピクセルアートを作っていきます。
今回の記事では、Adobe Illustrator に取り込んだ下絵を使って、グリッドに色を塗っていく作業を紹介します。
最初に言っておくと、今回の作業は少し根気が要りますが、最後までお付き合いいただけたらうれしいです。
前回までの記事は、以下のリンクから参照してください。
- [1] Illustrator の基本情報・基本操作については、手織りグリッドデザインのためのアドビ イラストレーター
- [2] グリッドテンプレートの作り方については、アドビ イラストレーターで作るグリッドテンプレート
- [3] 下絵を取り込む方法については、アドビ イラストレーターに下絵を取り込む
今回の作業の大まかな手順としては、以下になります。
1. Move, rotate and position the rough sketch | 下絵を移動・回転し、位置を決定する
In the previous article, the process of importing the rough sketch has been completed.
This time, we will start by moving and rotating this rough sketch to determine the position and angle at which it will be placed for actual weaving.
- Select Open from the File menu to open the previously saved file.
- Zoom in or out as needed to see the entire artboard.
Shortcut keys for zooming in/out and moving the screen:
- When selecting the Zoom tool, press “Z” on the keyboard to switch to the Zoom tool. In addition to this method, if you wish to use the Zoom tool temporarily, press “Spacebar + Command” on Mac or “Ctrl + Spacebar” on Windows to change to the Zoom In tool. To zoom out, press “Spacebar + Command + Option” on Mac or “Ctrl + Alt + Spacebar” on Windows.
- Use the Hand Tool as a tool to move the artboard. Press “H” on the keyboard to switch to the Hand tool. In addition to this method, if you want to temporarily switch to the Hand tool, press the space bar on the keyboard.
- When selecting the Zoom tool, press “Z” on the keyboard to switch to the Zoom tool. In addition to this method, if you wish to use the Zoom tool temporarily, press “Spacebar + Command” on Mac or “Ctrl + Spacebar” on Windows to change to the Zoom In tool. To zoom out, press “Spacebar + Command + Option” on Mac or “Ctrl + Alt + Spacebar” on Windows.
前回の記事では、下絵を取り込んだところまでの作業が完了しました。
今回は、この下絵を移動したり、回転したりして、実際に織るときにどのような位置と角度に配置するかを決めるところから始めます。
- ファイルメニューから開く を選択し、前回保存したファイルを開きます。
- アートボード全体が見えるように必要に応じて画面を拡大または縮小します。
画面拡大・移動のショートカットキー:
- ズームツールを選択するときに、キーボードの「Z」を押すとズームツールに切り替わります。この方法以外に、一時的にズームツールを使いたい場合は、Mac の場合は、「スペースバー + Command 」、Windows の場合は、「Ctrl + スペースバー」を押すと、ズームイン(画面拡大)ツールになります。ズームアウト(画面縮小)ツールにしたい場合には、Mac の場合は、「スペースバー + Command + Option」、Windows の場合は、「Ctrl + Alt + スペースバー」を押します。
- アートボードを動かすツールとして、手のひらツールを使います。キーボードの「H」を押すと、手のひらツールに切り替わります。この方法の他に、一時的に手のひらツールにしたい場合には、キーボードのスペースバーを押すと、手のひらツールになります。
- ズームツールを選択するときに、キーボードの「Z」を押すとズームツールに切り替わります。この方法以外に、一時的にズームツールを使いたい場合は、Mac の場合は、「スペースバー + Command 」、Windows の場合は、「Ctrl + スペースバー」を押すと、ズームイン(画面拡大)ツールになります。ズームアウト(画面縮小)ツールにしたい場合には、Mac の場合は、「スペースバー + Command + Option」、Windows の場合は、「Ctrl + Alt + スペースバー」を押します。
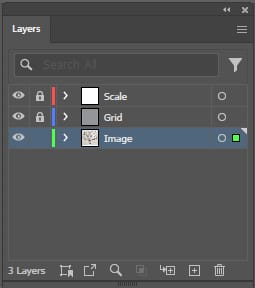
- Three layers are currently created. Only the image layer on which the rough sketch is placed will be edited. Lock all layers except the image layer.
- 現在3つのレイヤーが作成されています。下絵を置いたイメージレイヤーのみ編集できる状態にします。イメージレイヤー以外はロックします。
- Select the Selection tool and click on the image to select it.
Move the mouse over any of the four corners, and when the rotation mark (rounded arrows) appears, you can rotate the image.
To change the size of the image, move the mouse over any of the four corners, and when the scaling mark (straight arrows) appears, you can change the size of the image. If you do this while holding down the Shift key on the keyboard, the aspect ratio will be preserved.
Drag to adjust the position of the image.
- 選択ツールを選択し、下絵の画像をクリックして選択します。
四つ角のどれかにマウスを移動し、回転マーク(丸角の矢印)が表示されたら、画像を回転することができます。
画像の大きさを変更したい場合も、四つ角のどれかにマウスを移動し、拡大・縮小マーク(直線の矢印)が表示されたら、画像の大きさを変更できます。このとき、キーボードの Shift キーを押しながら行うと、縦横比が保持されたまま変更されます。
ドラッグして、画像の位置を調整します。
In the sample lotus flower, the image was rotated 90 degrees and placed horizontally to minimize the slits (vertical lines) when weaving. Now the rough sketch image is positioned.
サンプルの蓮の花では、織るときにスリット(縦ライン)ができるだけ少なくなるよう、イメージを90度回転して横向きに配置しました。これで、下絵の位置が決まりました。
2. Select your favorite colors in the Color Guide and save them to the Swatches | カラーガイドで好きな色を選んでスウォッチに保存する
Next, select some of your favorite colors from the Color Guide and save them in the Swatches panel.
- Select Color Guide from the Window menu to display the Color Guide panel.
- If the Swatches panel is not displayed, select Swatches from the Window menu as well.
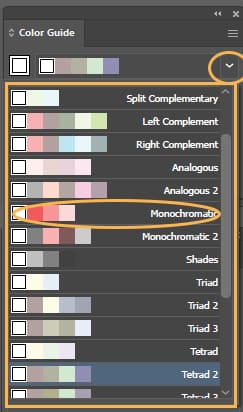
- Click the Harmony Rules (down arrow) in the Color Guide panel to display a list of color groups. Select your favorite color from this list.
In the sample, the Monochromatic color group is selected.
次に、カラーガイドで好きな色をいくつか選んで、スウォッチパネルに保存をしておきましょう。
- ウィンドウメニューからカラーガイドを選択し、カラーガイドパネルを表示します。
- スウォッチパネルが表示されていない場合は、同じく、ウィンドウメニューからスウォッチを選択してください。
- カラーガイドパネルのハーモニールール(下向き矢印)をクリックすると、カラーグループのリストが表示されます。この中から好きな色を選択します。
サンプルでは、モノクロマティックのカラーグループを選択しています。
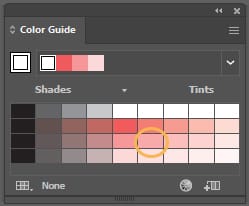
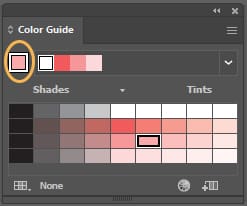
- When a color group is selected, the color variations are displayed in the Color Guide. Double-click on a color you want.
In the sample, I double-clicked the circled pink.
- カラーグループを選択すると、カラーガイドにカラーバリエーションが表示されますので、その中から好きな色をダブルクリックします。
サンプルでは、丸で囲ったピンクをダブルクリックしました。
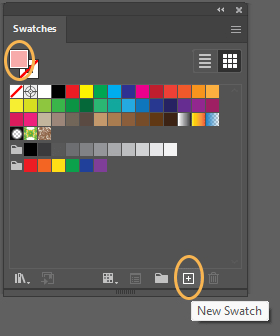
- The color you just double-clicked is applied to the upper left-most frame of the Color Guide.
At the same time, the same fill will be applied to the Swatches panel. Click on New Swatch.
- いまダブルクリックした色がカラーガイドの一番左上の枠に適用されます。
同時に、スウォッチパネルにも同じ塗りが適用されます。新規スウォッチをクリックします。
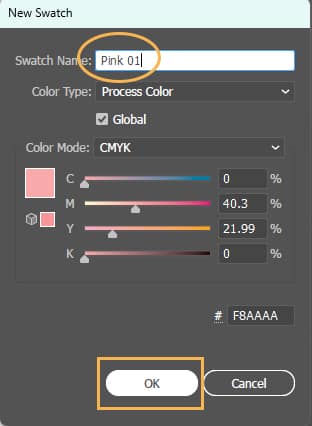
- Give the color an easy-to-understand name and click OK.
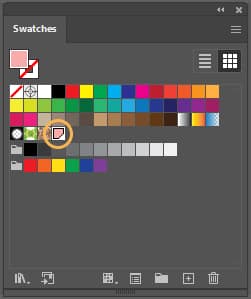
The color is now registered in the Swatches panel.
- 色にわかりやすい名前をつけて、OKをクリックします。
これで、スウォッチパネルに色が登録されました。
- Repeat the same procedure to register several colors to the Swatches.
You may have several weft colors. It will be fun to register colors as you think about which colors to weave with.
Here we will create a rough design. I will explain the process of thinking about and modifying colors in another article, so please register your favorite colors or colors you would like to use.
- 同じ手順を繰り返し、いくつかの色をスウォッチに登録します。
お手持ちのヨコ糸の色がいくつかあると思います。どの色で織るか考えながら色を登録するのも楽しいと思います。
ここでは、ラフなデザインを作ります。色について考えたり修正したりする作業は、また別の記事で説明したいと思いますので、まずは、好きな色、使ってみたい色などを登録してみてください。

3. Selecting and coloring multiple grid rectangles at once | グリッドの長方形を複数いっぺんに選択し、色をつけていく
Once the colors have been registered, the next step is to apply them to the rectangles of the grid, which can be a time-consuming process depending on the design. At this point, I would like to select and color as many rectangles as possible at once in the following steps:
- Only the grid layer should be editable. Lock the Image layer and unlock the Grid layer.
色の登録が終わったら、次は、デザインによっては、時間のかかる作業となりますが、グリッドの長方形に色をつけていきます。このとき、以下のステップで、できるだけいっぺんにたくさんの長方形を選んで、色をつけたいと思います。
- グリッドレイヤーのみ編集可能な状態にします。イメージレイヤーはロックし、グリッドレイヤーのロックは解除します。

- Beginning with the bottom petal, add color. Zoom in on the screen until the inside of the grid rectangles is clearly visible.
- 一番下にある花びらから色をつけていきます。グリッドの長方形の内側がよく見える状態まで画面を拡大します。
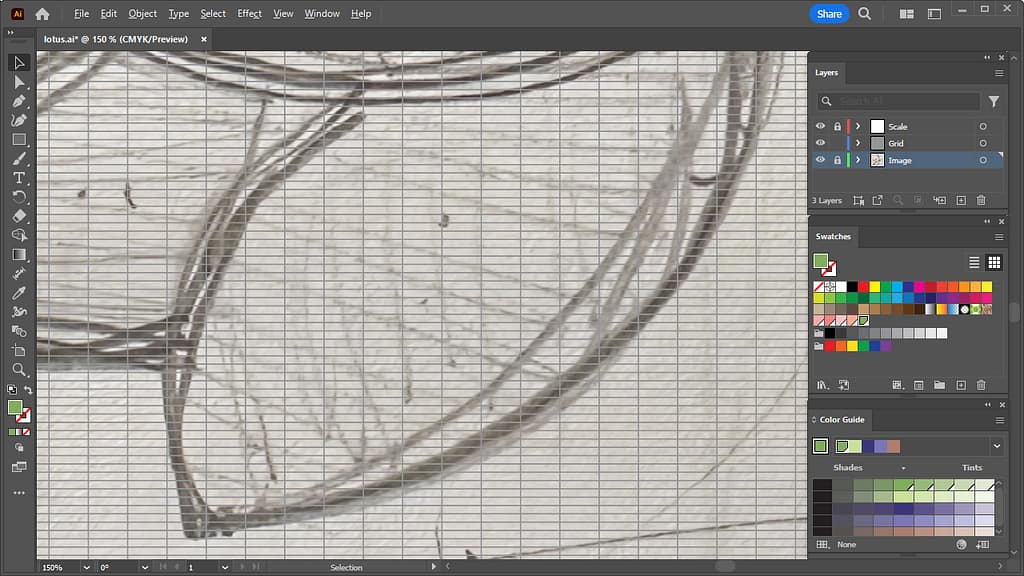
- With the Selection tool, place the mouse tip inside the grid rectangle. At this point, make sure that only the arrow on the mouse tip is visible, click and drag down.
This will allow you to select multiple vertical rectangles at once.
This is only possible because the rectangles’ fill is set to None (transparent) when the grid template is created. If the rectangles’ fill is colored, the rectangle will move when you click and drag it.
For information on how to create a grid template, see “Creating a Grid Template in Adobe Illustrator“.
If the rectangle has moved, select Undo Move from the Edit menu.
Alternatively, use the keyboard shortcut keys Command + Z for Mac or Ctrl + Z for Windows to undo.
If the selection does not work, click on an empty area of the artboard and reselect it again.
- 選択ツールで、グリッドの長方形の内側にマウスの先端を置きます。このときに、マウスの先端の矢印だけが見える状態であることを確認し、クリックして、下にドラッグします。
これで、縦に並ぶ複数の長方形を一度に選択することが可能となります。
これは、グリッドテンプレートを作った際に、長方形の塗りを「なし(透明)」に設定しているからこそできる作業となります。もし、長方形の塗りに何か色がついていると、クリックしてドラッグする際に、その長方形が動いてしまいます。
グリッドテンプレートの作り方については、「アドビ イラストレーターで作るグリッドテンプレート」を参照してください。
もし長方形が動いてしまった場合には、編集メニューから移動の取り消しを行います。
または、キーボードショートカットキーを使って、Mac の場合は、コマンド + Z、Windows の場合は、Ctrl + Z で取り消します。
選択がうまくいかない場合には、アートボードの何もない場所を一旦クリックしてから、再度選択しなおしてください。
- With multiple rectangles selected, select a color registered in the Swatch panel.
- Then select multiple rectangles vertically in the next column as well, and apply the same color. Repeat until the first petal is colored.
- 複数の長方形を選択している状態で、スウォッチパネルに登録した色を選択します。
- 続いて、隣の列も縦に複数の長方形を選択し、同じ色をつけていきます。一つ目の花びらの色が塗られるまで繰り返します。
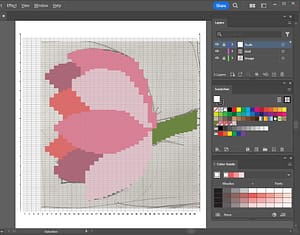
- After repeating the above process, eight lotus petals and the stem were colored.
- 上記の作業を繰り返し、蓮の花びら8枚と茎が塗られた状態となりました。
4. Save the file | ファイルを保存する
Once here, choose Save from the File menu to overwrite the file.
いったんここで、ファイルメニューから保存を選択し、ファイルを上書き保存しましょう。
Failed version | 失敗したバージョン
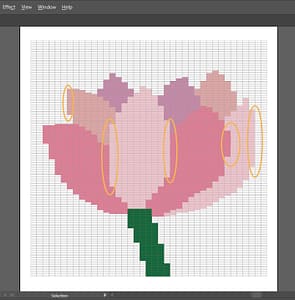
Actually, when I filled in the grid the first time, I did not turn the lotus flower sideways, and colored it in the same orientation as the drawing. The following image shows how it looked like at that time.
Imagining what it would be like when actually weaving, I noticed that vertical slits would occur in several places. I felt that this would be difficult when weaving.
Therefore, this article presents the procedure for creating a grid design with the lotus flower rotated 90 degrees to face sideways.
I hope this will be helpful as an example when considering the orientation of the design.
実は、私は、一回目にグリッドを塗りつぶしていったときは、蓮の花を横向きにせずに、デッサンと同じ向きのまま色をつけていきました。そのときの状態が以下の画像です。
実際に織ったときのことを想像し、縦のスリットが何か所か発生してしまうことに気づきました。これは、織るときに難しそうだなと感じました。
そのため、この記事では、蓮の花を90度回転して横向きにしてグリッドデザインを作る手順を紹介しています。
デザインの向きを考えるときの例として参考になれば幸いです。
In this article, we worked on creating a rough grid design.
In the next article, I will show you how to adjust the grid design, considering the weft pathways when actually weaving.
Thank you for reading to the end!
今回は、ラフなグリッドデザインを作っていく作業を行いました。
次の記事では、実際に織るときのヨコ糸の通り道のことを考えて、グリッドデザインを調整していく方法を紹介します。
最後まで読んでいただき、ありがとうございます。