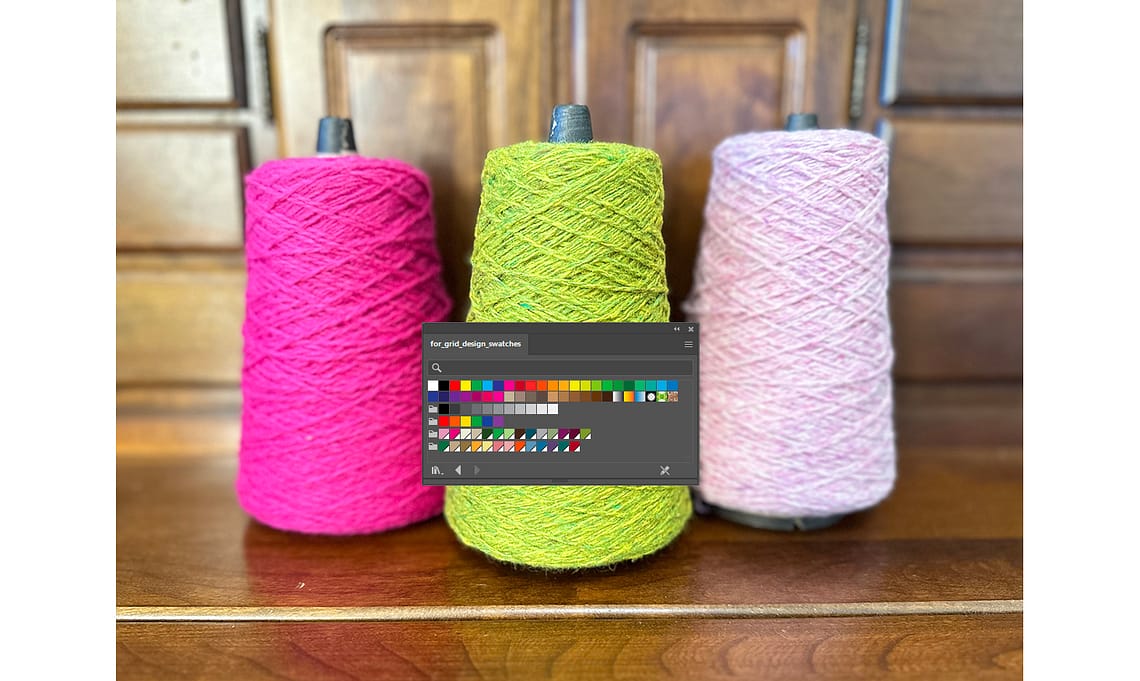
Have you ever experienced a slight discrepancy between the colors you imagined in your mind and the colors of the actual woven piece?
Also, do the colors look different depending on the colors next to each other?
For example, in my experience, when brown and light gray are next to each other, light gray looks light blue. Also, when green and cream colors are next to each other, cream color looks like light green.
The combinations of colors are infinite, and not only the combination but also the quantity of the color will give different impressions.
For example, suppose you have a color combination A and B. If you use the same amount of both colors, your weaving piece will look different than if you use more of A and less of B.
It is really difficult to think about color.
Weaving also takes time, so if possible, we would like to see a color combination that is somewhat close to the finished piece in advance.
In this article, I would like to put the grid design aside for now and explain the process of creating colors close to the colors of your weft threads in Adobe Illustrator.
For previous articles, please refer to the following links:
- [1] For basic information and basic operations of Illustrator, Adobe Illustrator for Weaving Grid Design
- [2] For information on how to create a grid template, Creating a Grid Template in Adobe Illustrator
- [3] For information on how to import a rough sketch, Placing a Rough Sketch in Adobe Illustrator
- [4] For information on how to create a rough grid design, Coloring on the Grid in Adobe Illustrator
- [5] For information on how to adjust the grid design, Adjust Grid Design for Easy Weaving (Work in Adobe Illustrator)
This article will discuss the following items:
頭の中でイメージした色と、実際に織って出来上がった作品の色が少しずれていたという経験はありますか?
また、隣り合わせになる色によって、その色が少し違う色に見えたりすることはないですか?
たとえば、私の経験ですが、茶色と薄いグレーが隣り合わせになったとき、薄いグレーが薄いブルーに見えます。また、緑とクリーム色が隣合わせになったとき、クリーム色が薄いグリーンに見えます。
色の組み合わせは無限で、組み合わせだけではなく、分量でも雰囲気が異なります。
例えば、AとBという色の組み合わせがあったとします。2つとも同じ分量を使ったときと、Aは多め、Bは少なめにした場合とでは、作品の印象が異なると思います。
色について考えるのは、ほんとうに難しいです。
織る作業にも時間がかかりますから、できれば、事前にある程度出来上がりに近い色の組み合わせを見てみたいものです。
今回の記事は、グリッドデザインはいったん脇に置いておいて、Adobe Illustrator でヨコ糸の色に近い色を作る作業について説明したいと思います。
前回までの記事は、以下のリンクから参照してください。
- [1] Illustrator の基本情報・基本操作については、手織りグリッドデザインのためのアドビ イラストレーター
- [2] グリッドテンプレートの作り方については、アドビ イラストレーターで作るグリッドテンプレート
- [3] 下絵を取り込む方法については、アドビ イラストレーターに下絵を取り込む
- [4] ラフなグリッドデザインを作る方法については、アドビ イラストレーターでグリッドに色を塗る
- [5] グリッドデザインの調整方法については、織りやすいようにグリッドデザインを調整(アドビ イラストレーターでの作業)
今回の記事では、以下の手順で色の登録作業を行っていきます。
1. Match the colors of weft threads you have with the colors to be registered in the Swatches | 手持ちのヨコ糸の色とスウォッチに登録する色を合わせる
In a previous article, “Coloring on the Grid in Adobe Illustrator,” the Color Guide and Swatches panels were used to register colors in a simplified manner.
This time, I would like to register colors as close as possible to the colors of your weft threads.
Follow the steps below:
- Prepare the weft yarn you want to register in front of your computer.
以前の記事「アドビ イラストレーターでグリッドに色を塗る」で、カラーガイドとスウォッチパネルを使って、簡易的に色の登録を行いました。
今回は、手持ちのヨコ糸の色にできる限り近い色を登録していきたいと思います。
以下の手順で作業していきます。
- 登録したい手持ちのヨコ糸をコンピュータの前に準備します。
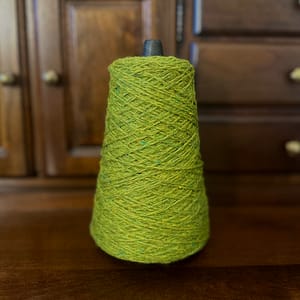
- In Illustrator, select New from the File menu to open a blank artboard.
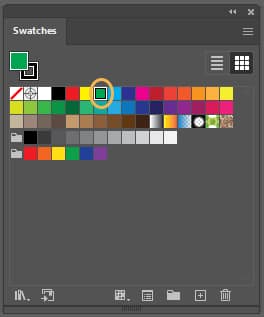
- Select Color Guide and Swatches from the Window menu to display their respective panels.
- Select a color from the Swatches panel or the Color Guide that closely matches the color of the weft you have.
In my sample, I selected green from the Swatches panel.
- Illustrator でファイルメニューから新規を選択し、白紙のアートボードを開きます。
- Window メニューからカラーガイドとスウォッチを選択し、それぞれのパネルを表示します。
- 手持ちのヨコ糸の色に近い色をスウォッチパネルまたはカラーガイドから選択します。
サンプルでは、スウォッチパネルから緑色を選択しました。
- The green I just selected will appear in the upper left frame of the Color Guide panel. Pull down the Harmony Rules to see the color scheme guide, and if there is a green color that more closely matches the actual weft color, select that color group.
- カラーガイドパネルの左上の枠に、今選択した緑が表示されます。ハーモニールールをプルダウンすると、配色のガイドが表示されますので、実際のヨコ糸の色にもっと近い緑色があれば、そのカラーグループを選択します。
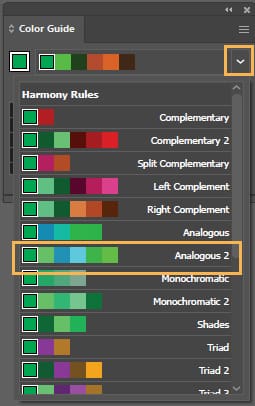
- From the selected color group, I selected a slightly more yellowish green by double-clicking it.
- 選択したカラーグループの中から、もうすこし黄色味がかった緑をダブルクリックして選択しました。
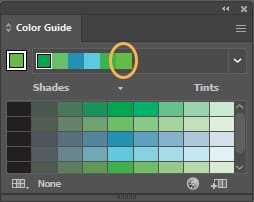
- The same yellow-green color will appear in the Swatches panel in the fill frame. Double-click this color.
- スウォッチパネルにも同じ黄緑が塗りの枠に表示されます。この色をダブルクリックします。
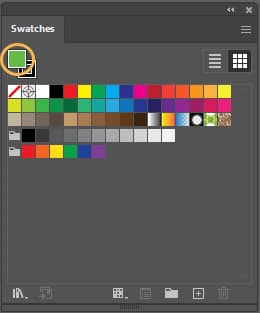
- The Color Picker appears.
- カラーピッカーが表示されます。
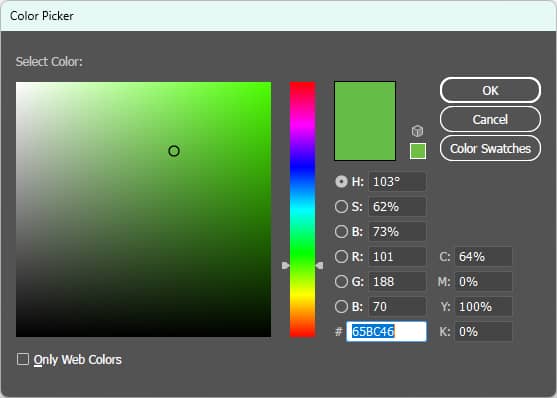
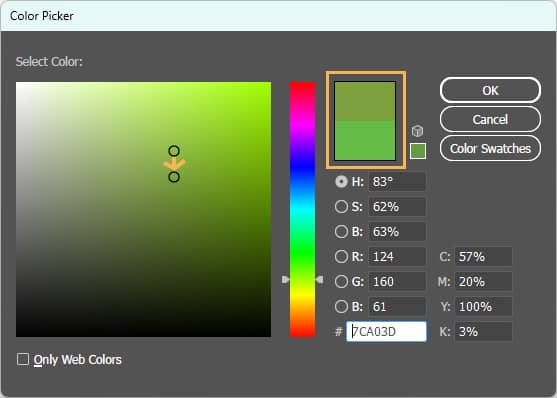
- I put the actual weft in front of the screen and looked at it, it needed a little more yellow. Move the slider in the center slightly toward yellow.
You will see a preview of the color after the change in the upper half of the rectangular frame to the right of the slider. The lower half is the color before the change.
- 実際のヨコ糸を画面の前に置いて見てみたところ、もう少し黄色味が必要でした。中央にあるスライダーを黄色の方に少し移動します。
そうすると、スライダーの右隣にある長方形の枠の上半分に変更後の色がプレビューされます。下半分は変更前の色です。
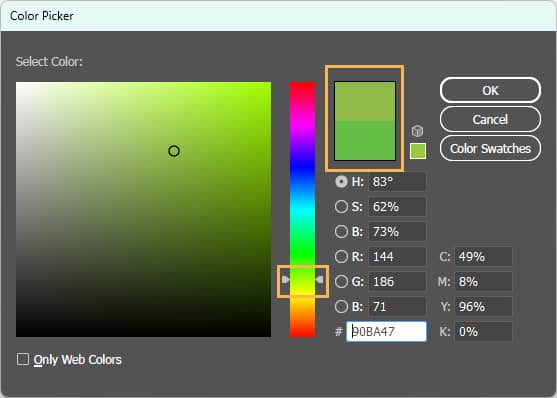
- Looking at the weft, it is a bit darker yellowish green, so this time I moved the black circle in the large frame on the left side by dragging it slightly downward.
The preview has changed again.
Click OK to confirm once.
- ヨコ糸を見ると、もう少し暗みのある黄緑なので、今度は、左側の大きな枠の中にある黒い丸を少しだけ下側にドラッグして移動しました。
プレビューがまた変更されました。
一旦これで確定するため、OKをクリックします。
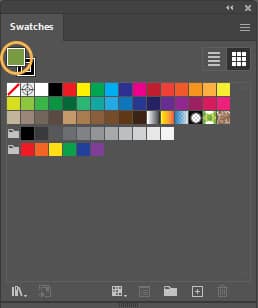
- The changed color is now applied to the fill in the Swatches panel.
Just to be sure, I would like to take another look at the color, so double-click again on the frame of this fill to display the Color Picker again.
- スウォッチパネルの塗りに変更後の色が適用されました。
念のため、もう一回色味を見てみたいので、この塗りの枠をもう一度ダブルクリックして、再度カラーピッカーを表示させます。
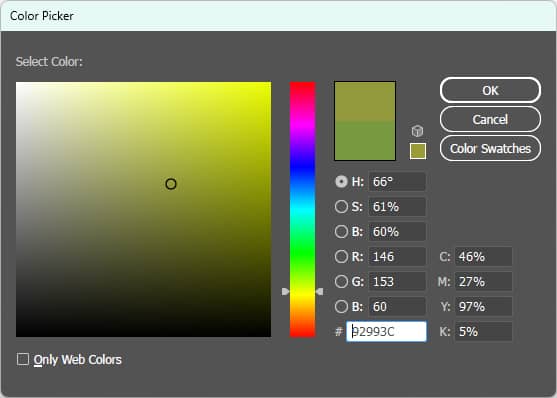
- Alternating between the actual weft and the screen, I still needed a bit more yellow tint, so I made some adjustments and would like to finalize this. Click OK.
- 実際のヨコ糸と画面を交互に見ながら、やっぱりもう少し黄色味が必要でしたので、調整を行い、これで確定としたいと思います。OKをクリックします。

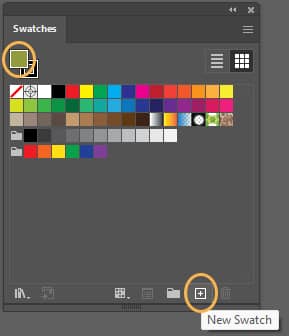
- Now I would like to register this green. Click on New Swatch, give it an easy-to-understand name, and click OK.
I have chosen a name that combines the name of the color and the brand name of the weft.
- では、この緑を登録したいと思います。新規スウォッチをクリックし、わかりやすい名前を付けて、OKをクリックします。
私は、色の名前とヨコ糸のブランド名を合わせた名前にしました。
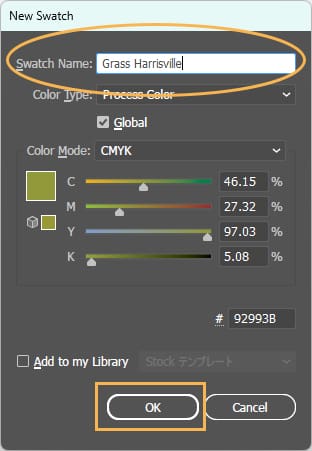
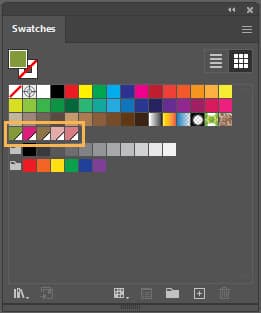
- Repeat the above steps, alternating between the weft and the screen, registering colors as close as possible.
The following screenshot shows 5 colors registered.
- 以上の手順を繰り返し、ヨコ糸と画面を交互にみながら、できるだけ近い色を登録していきます。
以下の画面ショットは、5個の色が登録された状態です。
2. Organize the Swatches panel | スウォッチパネルを整理する
Now, I would like to organize the registered colors for easy use in the future.
- In the Swatches panel, select the first green color you registered and click New Color Group.
では、登録した色を、今後、使いやすいように整理しておきたいと思います。
- スウォッチパネルで、登録した最初の緑色を選択し、新規カラーグループをクリックします。
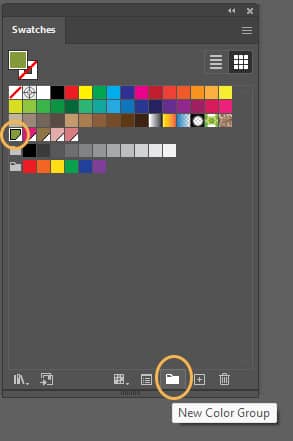
- Here I will create a folder for each weft brand. Enter the brand name and click OK.
- ここでは、ヨコ糸のブランドごとにフォルダーを作ります。ブランド名を入力し、OK をクリックします。
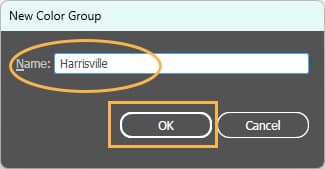
- The selected green color has been moved to a new color group folder.
- 選択した緑色が新しいカラーグループのフォルダーに移動しました。
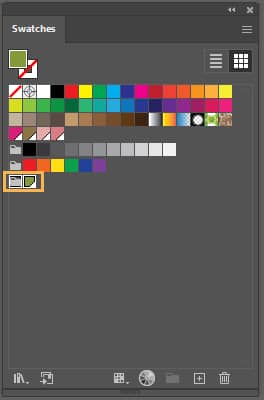
- In the sample, I also registered another weft for another brand, so I created another folder for the color group and moved the weft colors into each folder.
Watch the video below to see the steps.
- サンプルでは、もう一つ別のブランドのヨコ糸も登録しましたので、もうひとつカラーグループのフォルダーを作成し、それぞれのフォルダーにヨコ糸の色を移動しました。
以下の動画でステップを確認してください。
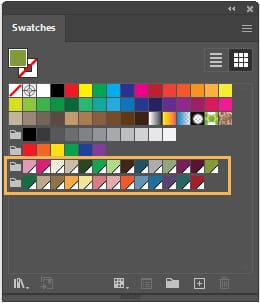
- If you have time, it would be a good idea to register all the wefts you will be using in the future.
I have registered the weft colors for each brand as follows and stored them in their respective color group folders.
- もし時間があれば、今後使うヨコ糸を全部登録しておくのもよいと思います。
私は、以下のようにそれぞれのブランドのヨコ糸の色を登録し、それぞれのカラーグループのフォルダーに格納しました。
3. Save the colors registered in the Swatches as a Library | スウォッチに登録した色をライブラリとして保存する
Next, save the registered colors as a swatch library.
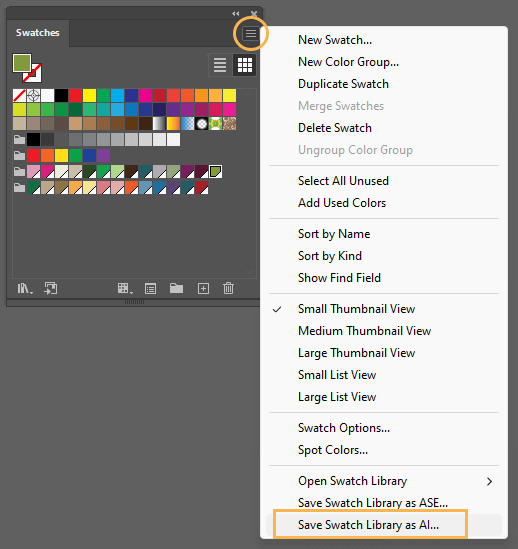
- Click on the menu in the upper right corner of the Swatches panel and select Save Swatch Library as AI.
AI stands for Adobe Illustrator.
次に、登録した色をスウォッチライブラリとして保存します。
- スウォッチパネルの右上のメニューをクリックし、スウォッチライブラリを Illustrator として保存 を選択します。
- Save the swatch library in an easy-to-understand location, such as your document folder or on the desktop, with an easy-to-understand name.
- ドキュメントフォルダーやデスクトップなど、わかりやすい場所に、わかりやすい名前でスウォッチライブラリを保存します。

- Save the blank file you are currently opening as a backup just in case.
Select Save from the File menu.
Similarly, save the file in an easy-to-understand location with an easy-to-understand name.
After saving, you can close the file.
- いま、開いている空白のファイルも念のためバックアップとして保存しましょう。
ファイルメニューから保存を選択します。
同様に、わかりやすい場所にわかりやすい名前で保存します。
保存したらファイルは閉じてもOKです。

4. Open the Swatch Library into your grid design file | グリッドデザインのファイルにスウォッチライブラリを読み込む
Now, open the grid design file that have been adjusted in the previous article and open the swatch library that we just saved.
- Select Open from the File menu to open the previously created grid design file.
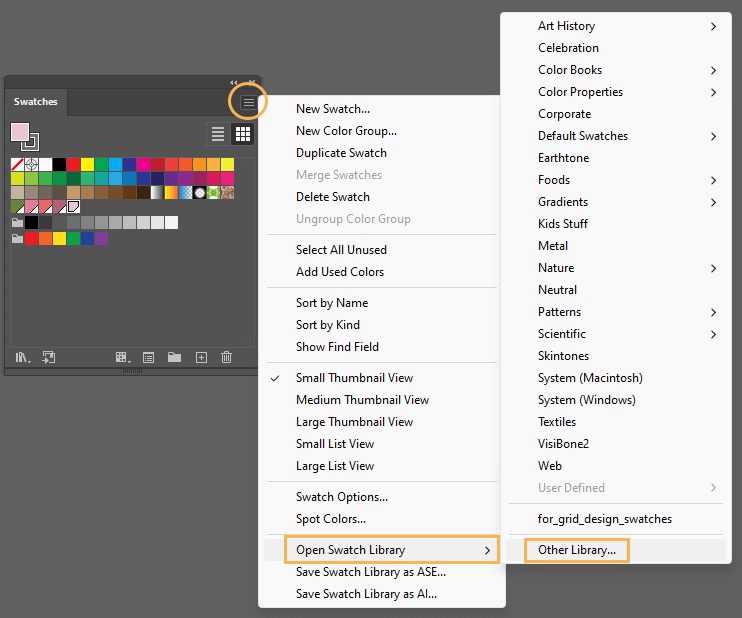
- Select Open Swatch Library > Other Library from the menu in the upper right corner of the Swatches panel.
では、前回の記事で、調整まで終わったグリッドデザインのファイルを開いて、さきほど保存したスウォッチライブラリを開きます。
- ファイルメニューから開く を選択し、前回作成したグリッドデザインのファイルを開きます。
- スウォッチパネルの右上のメニューから、スウォッチライブラリを開く > その他のライブラリ を選択します。
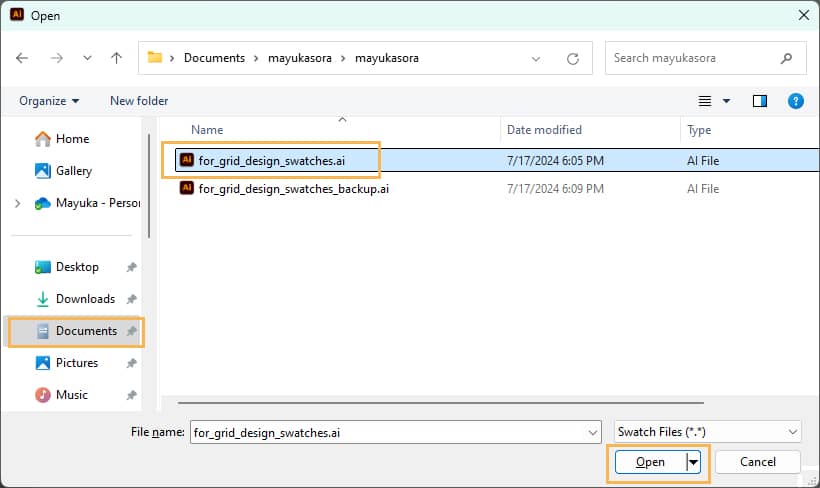
- Select and open the swatch library file we just saved.
- さきほど保存したスウォッチライブラリファイルを選択して開きます。
- A swatch library panel is now opened, separate from the Swatches panel.
If you want to modify the colors in the swatch library, open the swatch library file that was saved in step 2 of the above procedure 3 “Save the colors registered in the Swatches as a Library“, modify it, and overwrite it.
Then reopen the swatch library file in the grid design file.
- スウォッチパネルとは別に、スウォッチライブラリのパネルが開かれました。
スウォッチライブラリの色を修正したい場合には、上記の手順3「スウォッチに登録した色をライブラリとして保存する」のステップ2で保存したスウォッチライブラリファイルを開いて、修正後、上書き保存します。
そのあと、再度、グリッドデザインのファイルで、スウォッチライブラリファイルを開きなおします。

Now we have registered colors in the Swatch Library that are as close as possible to the colors of the weft threads.
In the next article, I will explain how to apply the colors registered this time to the grid design, to think about the color scheme, and to confirm the image of the finished pieces.
Thank you for reading to the end!
これで、ヨコ糸の色にできるだけ近い色がスウォッチライブラリに登録されました。
次の記事では、今回登録した色をグリッドデザインに当てはめて、配色を考えたり、完成品のイメージを確かめる作業について説明したいと思います。
最後まで読んでいただき、ありがとうございます。