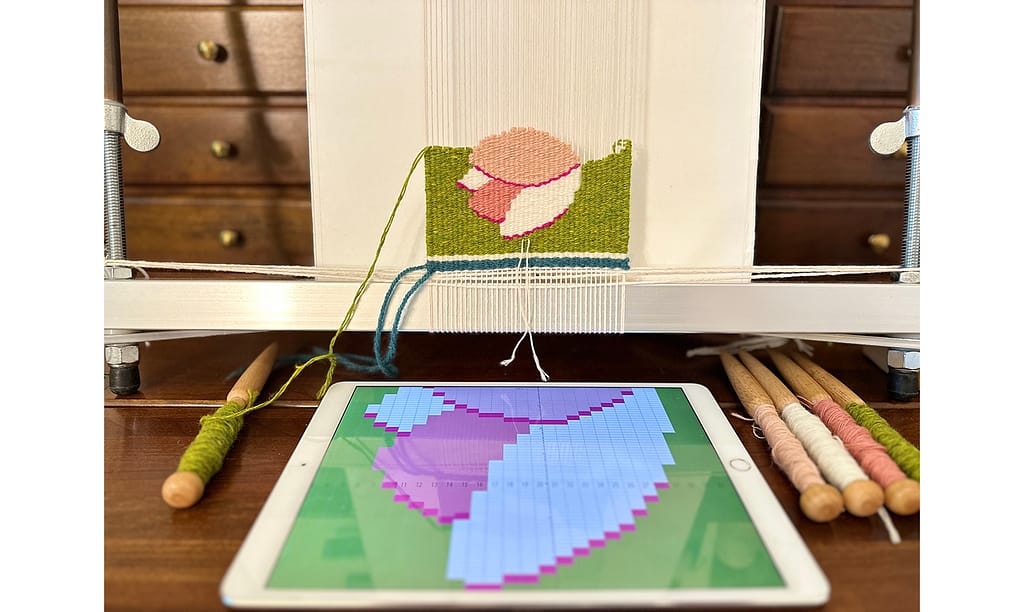
In the past seven articles, I have shared information on how to create a grid design using Adobe Illustrator.
In this article, as the final step, I will show you how to convert the grid design you have created on your computer to a versatile PDF file so that it can be viewed on other devices such as tablets that do not have Illustrator installed.
In doing so, I would like to add a little twist before converting the design to a PDF file.
For previous articles, please refer to the following links:
- [1] For basic information and basic operations of Illustrator, Adobe Illustrator for Weaving Grid Design
- [2] For information on how to create a grid template, Creating a Grid Template in Adobe Illustrator
- [3] For information on how to import a rough sketch, Placing a Rough Sketch in Adobe Illustrator
- [4] For information on how to create a rough grid design, Coloring on the Grid in Adobe Illustrator
- [5] For information on how to adjust the grid design, Adjust Grid Design for Easy Weaving (Work in Adobe Illustrator)
- [6] For information on how to register colors close to the weft, Matching Weft Colors for Grid Design in Adobe Illustrator
- [7] For information on useful features for making color schemes of grid designs, Considering Color Schemes in Grid Design Using Layers
In this article, I will explain the following items. Let’s make the grid easier to read for weaving.
これまでの記事では、7回に分けて、Adobe Illustrator を使って、グリッドデザインを作る方法を紹介してきました。
今回は、最後の作業として、いままでコンピュータで作成したグリッドデザインを、Illustrator がインストールされていない他のデバイス(例えば、タブレット)でも見ることができるように、汎用性のある PDF ファイルにする方法を紹介します。
その際に、ちょっとした工夫を加えてから PDF ファイルにします。
前回までの記事は、以下のリンクから参照してください。
- [1] Illustrator の基本情報・基本操作については、手織りグリッドデザインのためのアドビ イラストレーター
- [2] グリッドテンプレートの作り方については、アドビ イラストレーターで作るグリッドテンプレート
- [3] 下絵を取り込む方法については、アドビ イラストレーターに下絵を取り込む
- [4] ラフなグリッドデザインを作る方法については、アドビ イラストレーターでグリッドに色を塗る
- [5] グリッドデザインの調整方法については、織りやすいようにグリッドデザインを調整(アドビ イラストレーターでの作業)
- [6] ヨコ糸に近い色を登録する方法については、アドビ イラストレーターでグリッドデザインのためのヨコ糸色合わせ
- [7] グリッドデザインの配色時に使える便利な機能については、レイヤーを利用してグリッドデザインの配色を考える
今回の記事では、以下の項目を説明します。織るときのために、グリッドを見やすくしていきましょう。
1. Save the grid design file as a different name | グリッドデザインのファイルを別名保存する
First, save the grid design file you have been working on in Illustrator under a different name.
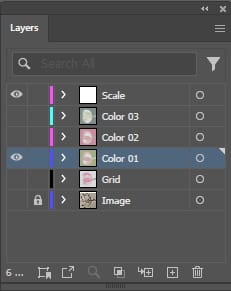
- Open the grid design file in Illustrator, and in the Layers panel, display the scale layer and the layer with the color scheme you like best.
In the sample, the “Scale” layer and the “Color 01” layer are displayed. If these layers are locked, unlock them. Hide the other layers.
最初に、これまで Illustrator で作成してきたグリッドデザインのファイルを別名で保存します。
- Illustrator でグリッドデザインのファイルを開き、レイヤーパネルで、目盛のレイヤーと一番気に入った配色のレイヤーを表示させます。
サンプルでは、「Scale」レイヤーと「Color 01」レイヤーを表示させました。これらのレイヤーがロックされていたら、ロックを解除してください。その他のレイヤーは非表示にします。
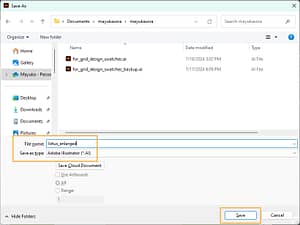
- Select Save As from the File menu.
- Add some name to the file name and save it.
In the sample, I named the file “lotus_enlarged”.
- ファイルメニューから別名で保存を選択します。
- ファイル名に何か名前を追加して保存してください。
サンプルでは、「lotus_enlarged」という名前にしました。
2. Scale the grid vertically before converting to PDF | PDF にする前に、グリッドを垂直方向に拡大する
As you may have noticed, the grid design we have created so far consists of very horizontal rectangles.
For this reason, I always enlarge the grid vertically and save it. The procedure is as follows:
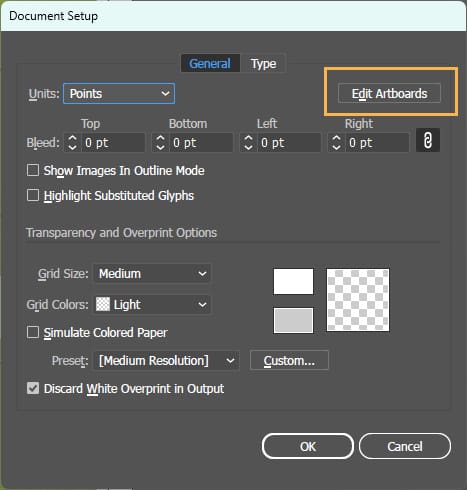
- With the file you just saved as open, open the File menu again, this time selecting Document Setup.
- The following window will appear. Click on the Edit Artboards button.
お気づきかもしれませんが、いままで作成してきたグリッドデザインは、非常に横長の長方形で構成されているので、このまま使うと、とても見づらいと思います。
そのため、私は、いつも縦方向に拡大してファイルを保存します。手順を以下に紹介します。
- いま別名で保存したファイルを開いたまま、再度ファイルメニューを開き、今度は、ドキュメント設定を選択します。
- 以下のウィンドウが表示されます。アートボードを編集ボタンをクリックします。
- A blue dotted line will appear on the artboard border. Drag the white square on the bottom edge downward to extend the artboard.
- そうすると、アートボードの境界線にブルーの点線が表示されます。一番下の辺にある白い四角を下方向にドラッグし、アートボードを細長くします。
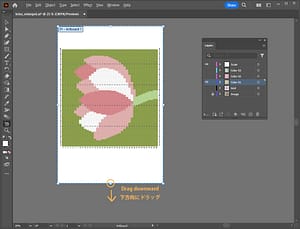
- Switch to the Selection tool and the blue dotted line will disappear and the extended artboard will be finalized.
- Scale down the screen so that the entire artboard is visible.
- Select All from the Select menu.
Or use the shortcut keys: Command + A for Mac, Ctrl + A for Windows. - Click on Object Menu – Transform and select Scale.
- In the Non-Uniform – Vertical field, type “150%” and click OK.
The grid design will be vertically expanded, but this will make the grid easier to see when weaving.
If necessary, it can be expanded as much more as desired, such as 160% or 170% instead of 150%.
- 選択ツールに切り替えると、ブルーの点線がなくなり、細長いアートボードが確定されます。
- アートボード全体が見えるように画面を縮小してください。
- 選択メニューからすべてを選択を選択します。
または、ショートカットキーで、Mac の場合は、コマンド+A、Windows の場合は、Ctrl+A を使います。 - オブジェクトメニュー/変形 をクリックし、拡大・縮小 を選択します。
- 縦横比を変更/垂直方向のフィールドに「150%」と入力し OK をクリックします。
グリッドデザインが縦に膨張されますが、これによって、織るときにグリッドが見やすくなります。
必要であれば、150%ではなく、160%や170%などもっと膨張させてもよいと思います。お好みで膨張させてください。

- If the grid objects extend beyond the top of the artboard, hold down the Shift key and tap the down arrow key on the keyboard about 10 times while keeping all the objects selected.
This will move the object downward about 3.5 cm (1.5 in).
If all objects are moved inside the artboard, you are good to go.
- オブジェクトがアートボードの上側にはみ出している場合には、オブジェクト全部が選択されている状態のまま、Shift キーを押しながら、キーボードの下向き矢印キーを10回ほど叩きます。
そうすると、下方向に3.5センチほど動くと思います。
アートボードの内側にすべてのオブジェクトが移動されていれば、OKです。
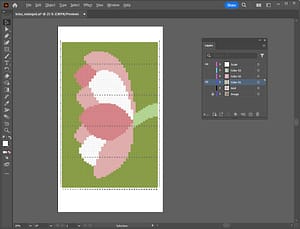
- Now save the file once. Select Save from the File menu.
- Next, as an option, if you want to add more scales, you can copy the existing scales and place them in several places.
In the sample, the vertical scale on the left side is placed on the right side as well, and four horizontal scales are added in the upward direction.
To copy, use Transform – Move from the Object menu. - After adding the scales, select Save from the File menu again.
In the following images, you can compare the readability before and after enlargement. After vertically enlarging the image, each rectangle should be easier to see.
- これでいったんファイルを保存します。ファイルメニューから保存を選択します。
- 次に、オプションとなりますが、もっと目盛を付け足したい場合には、いまある目盛をコピーして数か所に置いてもいいと思います。
サンプルでは、左側の縦の目盛を右側にも設置し、横の目盛を上方向に4か所追加しました。
コピーする方法は、オブジェクトメニューの変形/移動を使います。 - 目盛の追加が終わったら、再度ファイルメニューから保存を選択します。
以下の画像で、拡大前と後での見やすさを比較できます。縦方向に拡大後は、ひと升ひと升が見やすくなっていると思います。
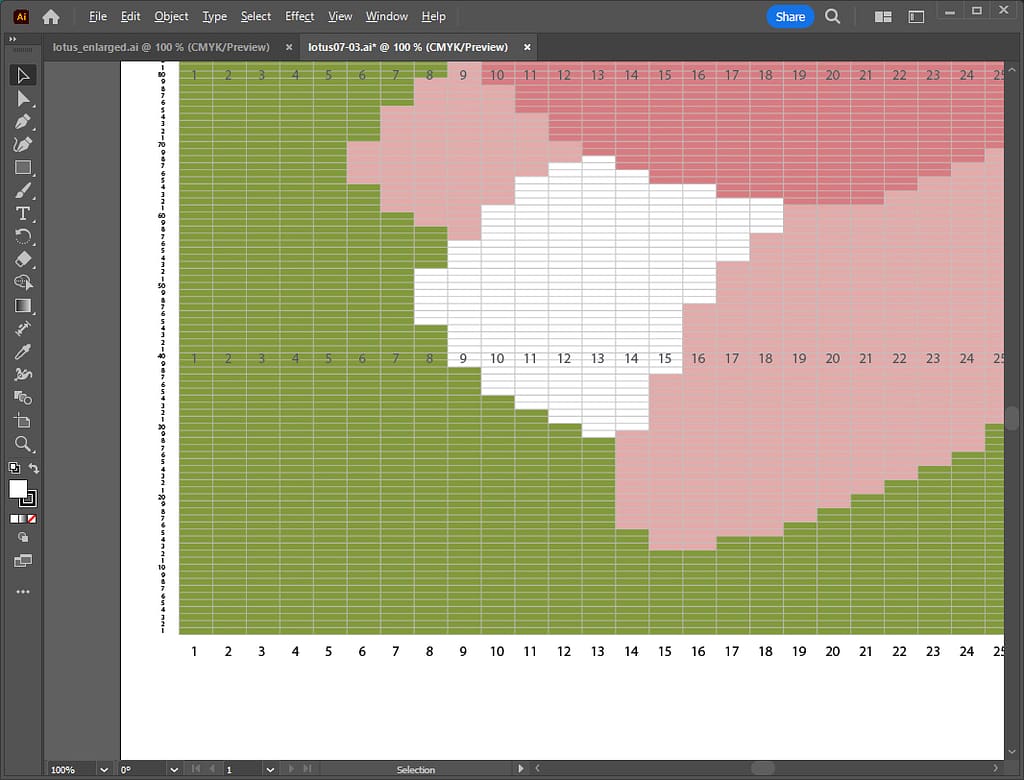
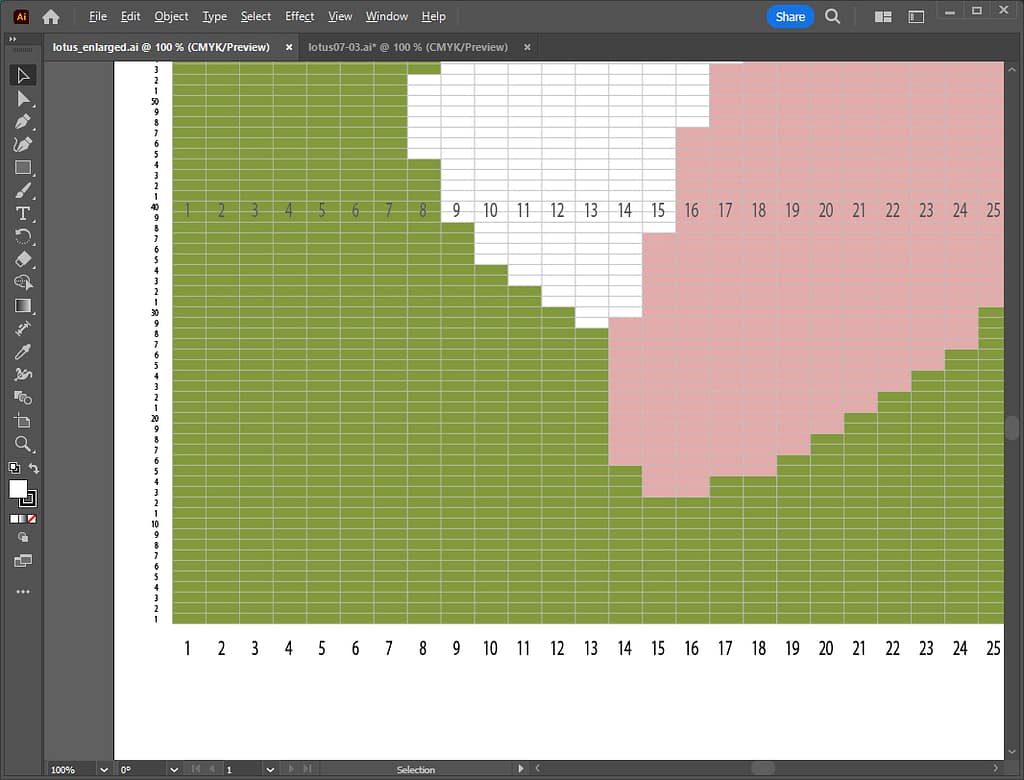
3. Save as PDF format | PDF 形式で保存する
Now, let’s save the file in PDF file format.
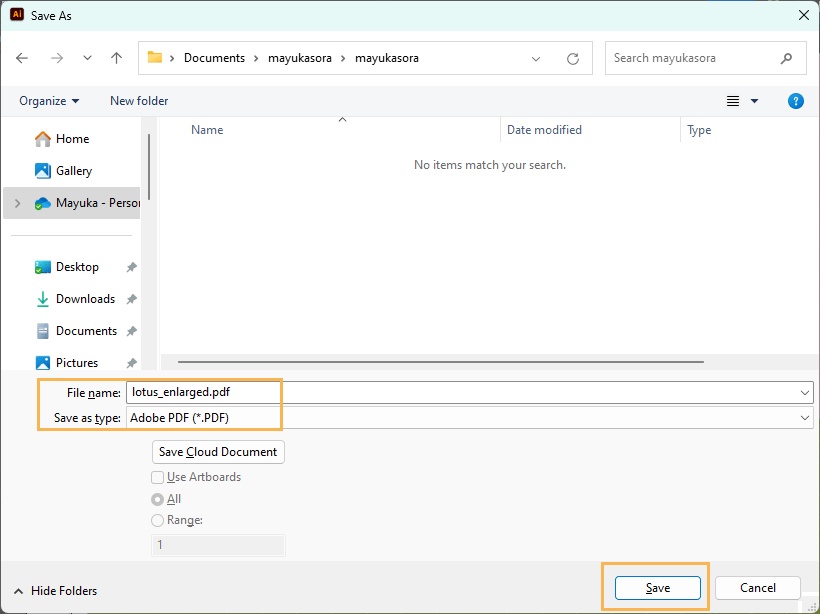
- Open the File menu and select Save As.
- Select “Adobe PDF” as the file format. You can leave the file name as it is.
Select a location that is easy to find, such as the document folder or the desktop, for the save location.
では、PDFファイルフォーマットに保存します。
- ファイルメニューを開き、別名で保存を選択します。
- ファイルフォーマットに「Adobe PDF」を選択します。ファイル名はそのままでもOKです。
保存場所は、ドキュメントフォルダーやデスクトップなどわかりやすい場所を選択してください。
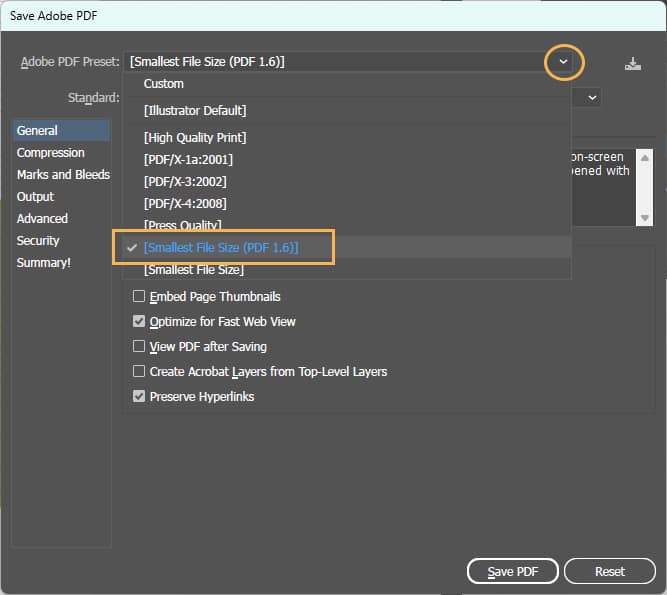
- The following window will appear. Select “Smallest File Size (PDF 1.6)” from the Adobe PDF Preset pull-down and click the Save PDF button.
- 以下のウィンドウが表示されます。Adobe PDF プリセットのプルダウンから「最小ファイルサイズ(PDF 1.6)」を選択し、PDF を保存ボタンをクリックします。
- The following message will appear asking if you wish to preserve Illustrator editing capabilities. Since the file size will be smaller if you do not preserve them, click OK and save the file as is.
In the future, if you want to edit the file, you can do so using the file saved in Illustrator format. Here, I would like to prioritize reducing file size for PDF files.
- 以下のメッセージが表示されます。Illustratorの編集機能を保持するかどうかを確認するメッセージとなります。保持しない方がファイルサイズが小さくなるので、このままOKをクリックして保存してください。
今後もし、ファイルを編集したいときには、Illustrator 形式で保存したファイルを使って編集します。PDF形式のファイルはファイルサイズを小さくすることを優先します。

- Open the saved PDF file with your PDF viewing software; Adobe’s Acrobat Reader is available for free download.
- If it opens without any problems, your PDF creation is complete.
The link to the Acrobat Reader download site is below. Clicking on the link will take you to Adobe’s page.
- 保存した PDF ファイルを PDF 閲覧ソフトで開いてみましょう。Adobe の Acrobat Reader は無償でダウンロード可能です。
- 問題なく開けたら、これで PDF 作成は完了です。
Acrobat Reader のダウンロードサイトへのリンクは以下です。リンクをクリックすると、アドビ社のページに飛びます。
4. Open and review on other devices | 他のデバイスで開いて確認する
Check to see if you can open the PDF file you created on another device.
An easy way to do this is to send a PDF attachment to an email to yourself and open the attachment on the device that will receive the email.
For example, you could receive the email on your iPad and simply open the PDF attached to the email.
Then, when weaving, you can place your iPad in front of your loom and weave while zooming in and out on the screen.
作成した PDF ファイルを別のデバイスでも開けるかどうか確認してみましょう。
簡単な方法としては、自分宛てのメールに PDF を添付して送り、メールを受け取れるデバイスで添付ファイルを開きます。
例えば、iPad でメールを受信し、メールに添付されている PDF を開くだけです。
そして、織るときには、手織り機の前に iPad を置いて、画面を拡大・縮小しながら織ることができます。

If you want to print the grid design on paper, the vertical expansion may not fit on a single sheet of paper. In that case, please print on two separate sheets of paper.
If you want to save color ink in your printer, you can also print in black and white;)
グリッドデザインを紙に印刷したい場合には、縦に膨張した分、一枚の用紙に収まらない可能性があります。その場合には、二枚の用紙に分けて印刷してください。
プリンターのカラーインクを節約したい場合には、白黒印刷するという方法もあります。
Grid design completed! | グリッドデザイン完成!
That is all for now, including this article, the procedures for creating a grid design using Adobe Illustrator have been explained in eight parts.
In total, five files were created as follows:
- A grid template file: File format is Illustrator format (.ai)
*When you want to create a new design, you can start with this template. - A grid design file made with actual aspect ratio: File format is Illustrator format (.ai)
*Use this file to edit the design when you need to modify it. - A grid design file expanded vertically for easy reference when weaving: File format is Illustrator format (.ai)
- A file in PDF format (.pdf) so that the above vertically expanded file can be opened on other devices.
- A swatch library file: File format is Illustrator format (.ai)
*If you want to modify the colors, use this file to edit them. After editing, open the file as a swatch library of grid design files.
以上で、今回の記事を含めて、8回に分けて、アドビ イラストレーターを使って、グリッドデザインを作成する手順をひととおり説明してきました。
ファイルは合計で、以下の5個作成しました。
- グリッドテンプレート:ファイル形式は、Illustrator 形式(拡張子. ai)
※新たなデザインを作りたいときには、このテンプレートから始めることができます。 - 実際の縦横比で作ったグリッドデザイン:ファイル形式は、Illustrator 形式(拡張子. ai)
※デザインを修正したいときには、このファイルを使って編集してください。 - 織るときに参照しやすいように縦に膨張させたグリッドデザイン:ファイル形式は、Illustrator 形式(拡張子. ai)
- 上記の縦に膨張したファイルを他のデバイスでも開けるように、PDFフォーマットにしたファイル(拡張子.pdf)
- スウォッチライブラリファイル:ファイル形式は、Illustrator 形式(拡張子. ai)
※色を修正したい場合には、このファイルを使って編集してください。編集後、グリッドデザインのファイルのスウォッチライブラリとして開いてください。

In addition to these files, several backups were also saved. Once these five files have been created, the grid design creation is complete!
I hope all the information in the series will be helpful for your weaving projects.
There are other useful functions in Illustrator, which I would like to introduce in the near future.
Thank you for reading to the end!
これらのファイルの他にいくつかのバックアップも保存しましたが、この5個のファイルが出来上がっていれば、グリッドデザイン作成が完了です!
これまで紹介した情報が、皆様の手織りプロジェクトの参考になれば幸いです。
イラストレーターでは、他にも便利な機能がありますので、追々紹介していきたいと思います。
最後まで読んでいただき、ありがとうございます。
